How I Remastered All Tom and Jerry Episodes to 2K in Just a Couple of Months
A complete walkthrough of remastering all 163 classic Tom and Jerry episodes to 1440p using AI upscaling, audio track reconstruction, color correction, and video compression — all done by one person over a few months.
Introduction
How did it all start? One day I decided to rewatch the entire original Tom and Jerry collection for the third time since childhood, but unlike a small child, I don't consume any content regardless of its quality. So I sat down to watch the most accessible version, and there was this color mess with constant scratches all over the screen.
A year later I learned about Topaz Video Enhance AI (now called Topaz Video AI) and decided to try upscaling to Full HD. The result was terrible. Film artifacts and video codec issues didn't disappear, and the image became sharp with an attempt at realism, which is inappropriate for a cartoon of this genre. After struggling like that for a month or two, I gave up. But then, gathering my courage, I started a second attempt.
Table of Contents:
- Good source material
- Assembling a unified Russian audio track
- Video resolution upscaling
- Frame interpolation
- Processing results, packing into .mkv containers
1. Good Source Material
Over the next six months I gathered information on the subject. It turns out there is a film remastering process where the film is coated with a special solution to remove scratches, deep scanning is performed, dozens of computer operations are carried out, and so on.
After a long search, I managed to find an archive on Internet Archive with most of the remastered episodes. The publication is now blocked for obvious reasons (piracy). However, it was still missing many episodes in "good quality" — specifically those that had been enhanced by HBO Max. That was about 5 years ago and there wasn't much demand, so I had to search for those through unofficial channels too. But roughly 15% of episodes remained at the level of simple film scanning with color correction, meaning with an absolutely massive number of scratches.
2. Assembling a Unified Russian Audio Track
This stage took a very long time. As we know, Tom and Jerry was extremely popular in the 1990s, and even now many translations have been recorded, but there's no single universal, guaranteed good one. One narrator might translate what's written on a wall in a scene, while 10 others won't. Four narrators might have professional voices, while others don't, and so on. Sometimes there's even a full dub! In other words, we need to take all these tracks and properly splice them into one. But beyond this problem, there's another one. All these audio tracks were of very poor quality, since they were mostly recorded onto VHS tapes (some episodes were broadcast on television). This means they'll be difficult to align with each other and with the original audio taken from the film in good quality.
First, you need to find the translated audio tracks themselves. I got lucky right away — on a well-known site starting with "Ru" there was a package containing roughly 12 tracks per episode, and sometimes up to 20.
Classic Tom and Jerry has 19 hours of total runtime, which is a lot for this type of work, so even after removing all tracks with clearly bad translations, the work took about 2 months.
I used Audacity because in my opinion, it's the best suited for this type of work — it provides quick access to basic tools and is easy to learn. It makes it simple to adjust speed relative to the original, mix audio tracks together, boost volume, edit a track after work is already finished, and so on.
After that, I found the Ultimate Vocal Remover utility, which allowed me to extract voice from a recording — for example, from a VHS tape — and place it over a good audio track taken from the original film. Improving all the tracks took 2 weeks. The audio quality on episode intros and outros improved noticeably. In total, all the projects took up approximately 150 GB.
Detailed Instructions for Audio Track Synchronization:
1. Select and delete silent sections at the beginning and end of both audio tracks.
2. Select the entire audio track you're aligning to the other one, then go to the "Effects" tab at the top, hover over "Pitch/Tempo" in the dropdown menu, and click "Change Speed...".
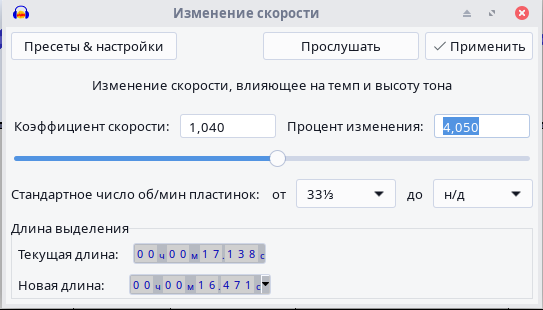
In this window, we only need one parameter — Percent Change. A positive number compresses the audio track, a negative number stretches it. First set a small number "by guess" and click "Apply," see how much is off and press Ctrl+Z, repeat the process adjusting the value in the right direction, trying to match the audio track as closely as possible. Once you've done that, hold Ctrl and scroll forward to zoom in closely on the audio track, find some isolated spike, and move the audio track so that the spike on both tracks lines up. If everything matches and the audio track in other places doesn't lag by more than a hundred milliseconds, you should undo all changes, and without deleting anything from the reference audio track, apply the speed change and align it by time again. Then delete the protruding right portion of the track being aligned. After that, you can proceed to the second stage.
Now it's time to listen through the audio track in the target language. Select each line in the target language, then press the End key, thereby splitting the audio track at the line's position. Next, delete the part that split off to the left, for example by pressing Ctrl+X. After that, click on the part of the audio track with the line and right-click on the original audio track onto which you plan to overlay these lines. In the popup menu, click "Split Clip," then delete it with the key combination mentioned earlier. Repeat this cycle until the end of the audio track. Obviously, the part remaining to the right of the last line needs to be deleted at the end. On to the third stage.
Save the project by pressing Ctrl+S. Then click the "Mute" button to the left of the audio track onto which we'll later overlay the target language lines, and export the audio data with the key combination Shift+Ctrl+E, choosing the format. I usually exported to MP3, but it's probably better to use WAV. Save and accept everything. On to the fourth stage.
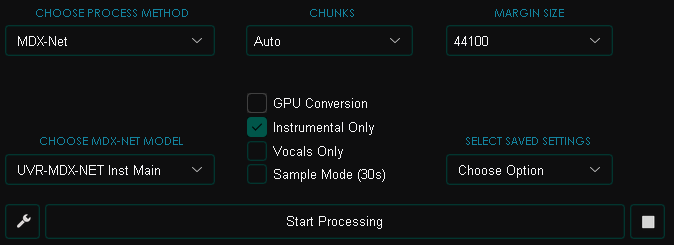
For this stage, we'll need the Ultimate Vocal Remover utility. In it, we'll use neural networks both to remove vocals from an audio track and to remove music while keeping only the vocals. Download it from GitHub, install, and open it. Click "Select Input" and choose the audio file with the original audio track onto which we'll later overlay the lines. Choose the export folder by clicking "Select Output," then set all the settings as shown in the screenshot and click "Start Processing."
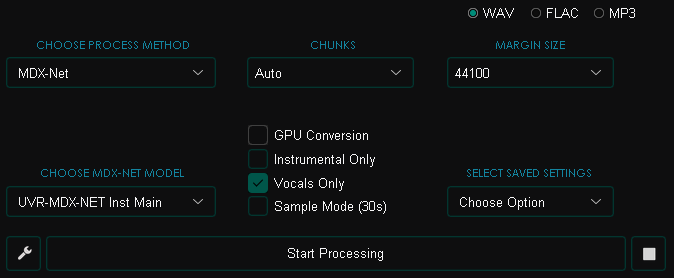
Wait for the process to finish, then perform the same operations on the lines (vocal) file that you saved in the third stage. But now with these settings:
On to the sixth stage.
Go back to Audacity — there's just a little left to do: paste the lines over the audio track. To do this, drop the needed files into Audacity again (the resulting clean audio track with lines, the original audio track, and the same original but without vocals).
It's essential to not do this in the previous project, so that in case of an error (didn't fully cut a line or the opposite), you have the ability to fix it by running the audio track through Ultimate Vocal Remover again.
Now cut out the moments with spikes on the audio track with lines, then boost them if the voice sounds too quiet. You can boost by going to the "Effects" tab at the top, then "Volume and Compression" → "Amplify." So, why do we need the original audio track without vocals? In moments where the narrator isn't just translating something written on screen but translating someone's voice, you'll hear it twice — since it comes from the original track and from our track with lines in the target language. To avoid this, you need to cut out the overlapping moments on the original track. Then cut out the same moments on the original without vocals.
Congratulations! Your suffering is over. I should also add that if you're planning to do this operation with more than a couple of episodes, the transition to the fourth stage can be done after finishing the first 3 stages for the remaining episodes, to make the work slightly less monotonous.
3. Video Resolution Upscaling
Let's start with the main tool — Topaz Video AI. This program includes a huge number of neural networks for different types of input video, from computer graphics to real life footage. And almost each of them has several training levels, from very low quality source data to very high quality. I performed a 300% upscale (1440p — the original was 480p).
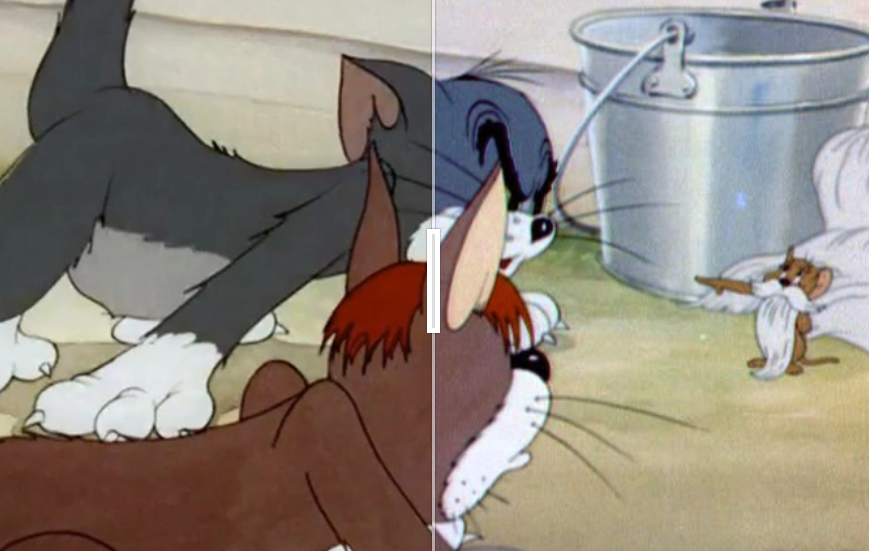
I chose the Iris model, which showed itself to be the best option in my comparisons. Topaz Video AI doesn't have a model created specifically for animation, but Iris manages to produce accurate detail while removing — I'm not afraid to say this — virtually all video artifacts. On top of that, it draws clean lines in places where most other neural networks would produce a layered cake effect, which is unsuitable for animation.
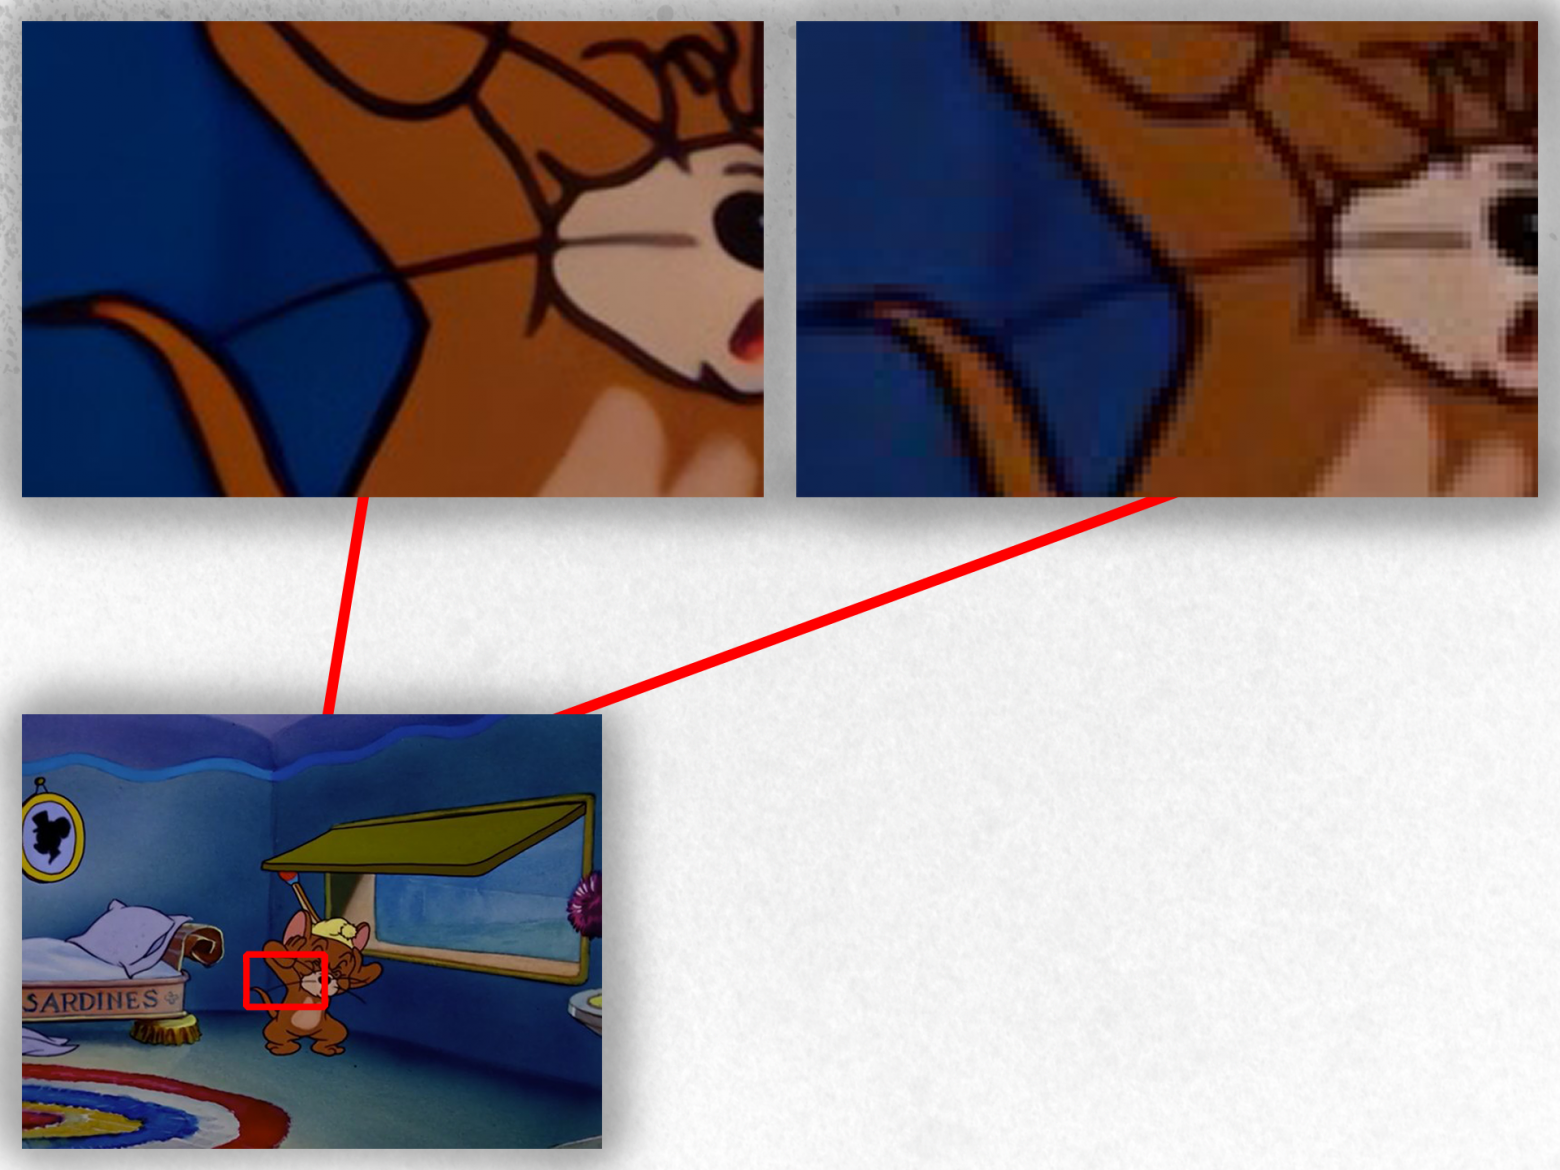
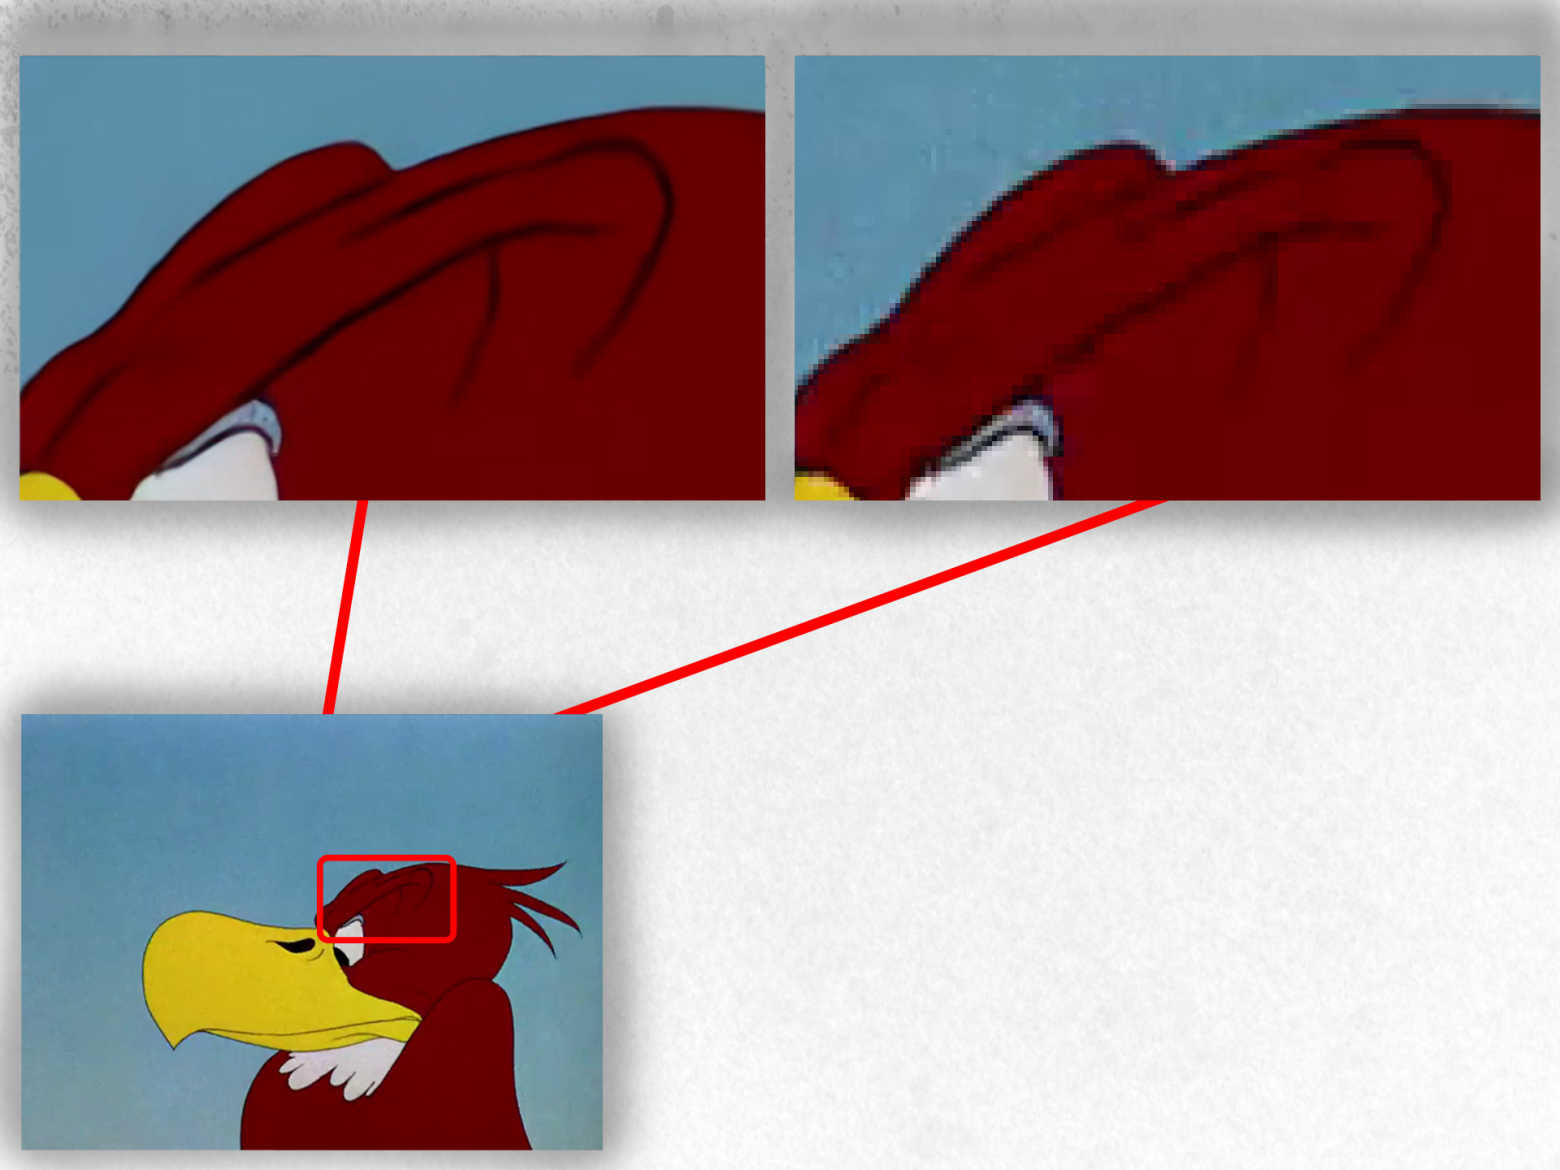
Examples showing how the neural network improves quality across sources of varying quality levels:
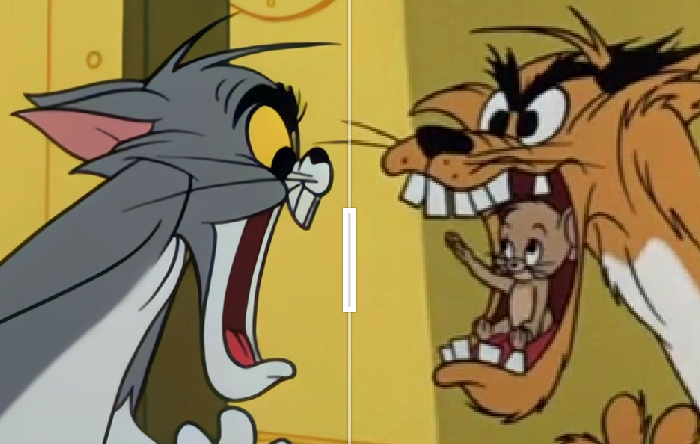
Several direct comparisons: 1, 2, 3
The obvious question is: why didn't 20 people do this before me? Simple. Processing all episodes takes 85–130 hours of GPU time at full load, not counting idle time when you need to use the PC for something else. Yes, there is one example of such work, but out of the 3 steps I described, only one was done, using a different, older neural network model, and with only 36 out of 163 episodes.
Topaz Video AI doesn't handle scaling well. On my RX 6600, processing one episode takes about 40 minutes, while on an RTX 4080 it takes about 25 minutes — but the difference should be at least threefold, not even accounting for Nvidia CUDA cores, which neural networks typically love.
P.S.
Why 2K and not 4K? No, it wouldn't require more processing time. The problem is that even upon careful inspection, there's practically no difference in image quality, and this happens because of insufficient source data for such a resolution. The mush would just become even mushier, while the corner and the video player itself would make things just slightly more precise.
4. Frame Interpolation
Why didn't I use FPS upscaling in my remaster? In short, here's the answer:
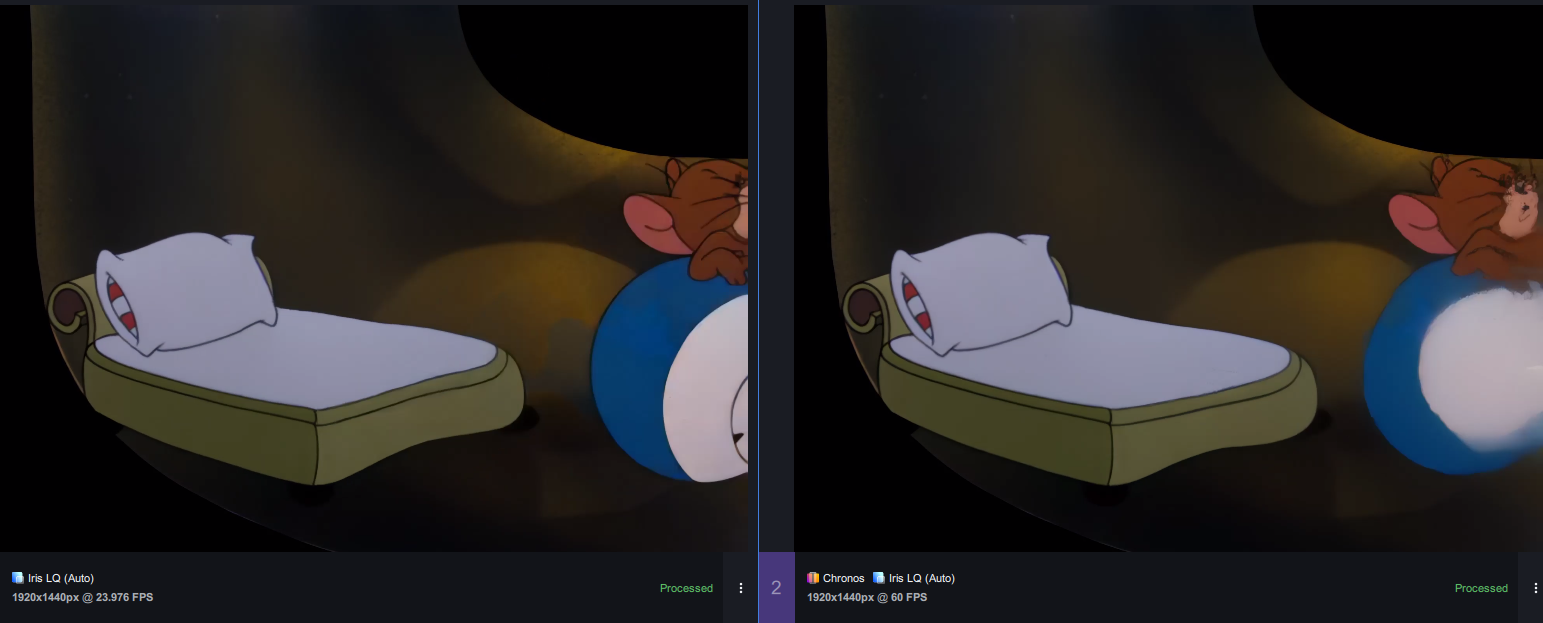
This is the most capable neural network I could find at all, and I searched far beyond Topaz Video AI. But it turned out that Chronos (the AI model from Topaz Video AI) is still the leader in this area.
Beyond that, frame interpolation consumes an absolutely immense amount of resources. The difference in processing time is a full 3x. So doing frame interpolation in my case is pointless and time-consuming.
5. Processing Results, Packing into .mkv Containers
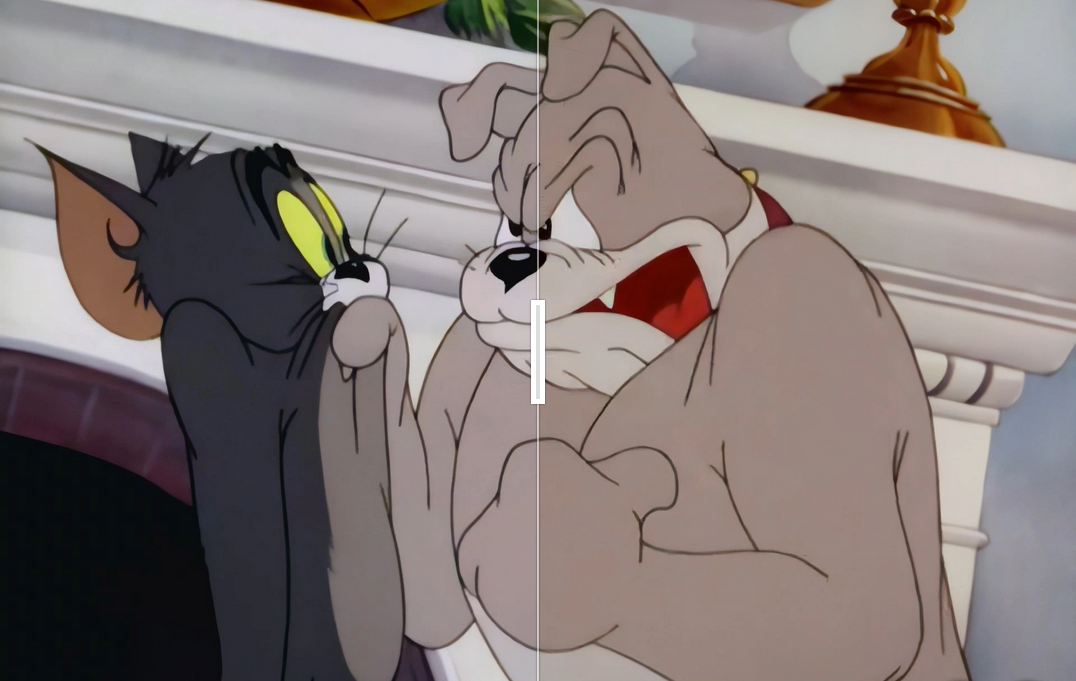
Let me start with the interesting part — color correction. It's simple: download Adobe Premiere Pro, repack the video to .mp4 if needed (for example using OBS Studio), for the episodes where you think the image looks washed out or conversely too saturated. Then create a new project, drop in the episode (I'll say upfront that I'm practically a zero at color correction, so I relied on guides from skilled people, and this one was especially useful), and start adjusting the many parameters in Lumetri Color, changing colors to taste. Then export in HEVC codec and wait for the video processing to finish.
Here's my example of such work:
In the end, with my settings (HEVC, bitrate 24 Mbps), all the upscaled episodes weighed approximately 190 GB, which is a lot. A single episode could be 1.5 GB — remember, it's 7 minutes long at 1440p resolution. That won't do. Since I mainly use Linux, I decided to use the video conversion utility HandBrake.
In the "Dimensions" tab, everything should be turned off except "Display Size," and set "Resolution Limit" to "8K Ultra HD."
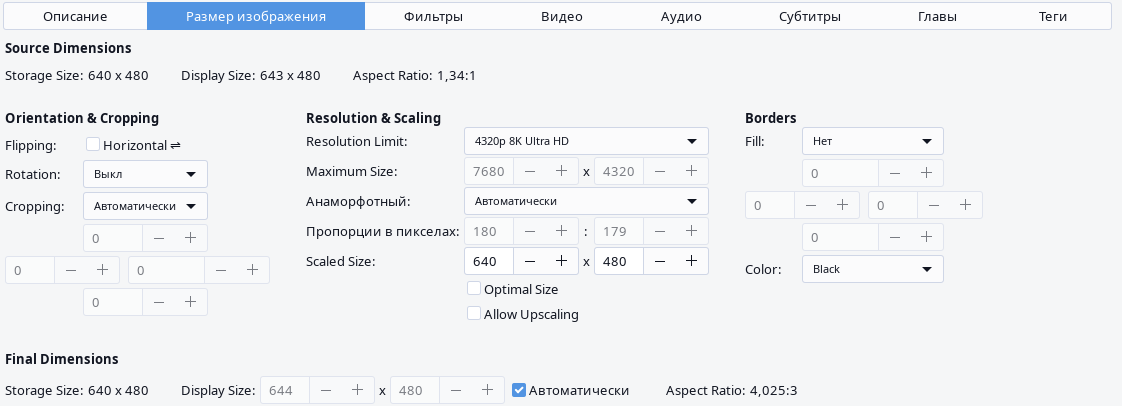
In the "Video" tab, the most optimal preset in my case (1440p 24fps) was: video encoder "H.265," constant quality "RF: 12," variable frame rate, preset "ultrafast," tune "animation."
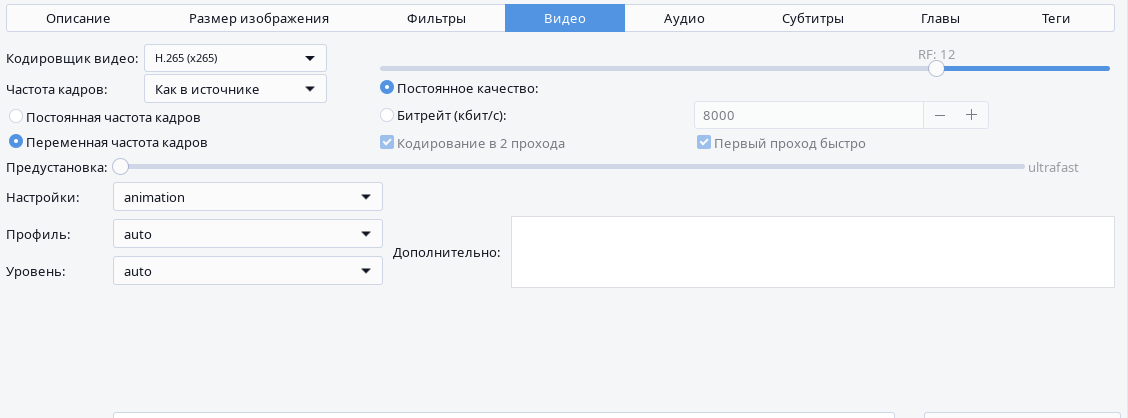
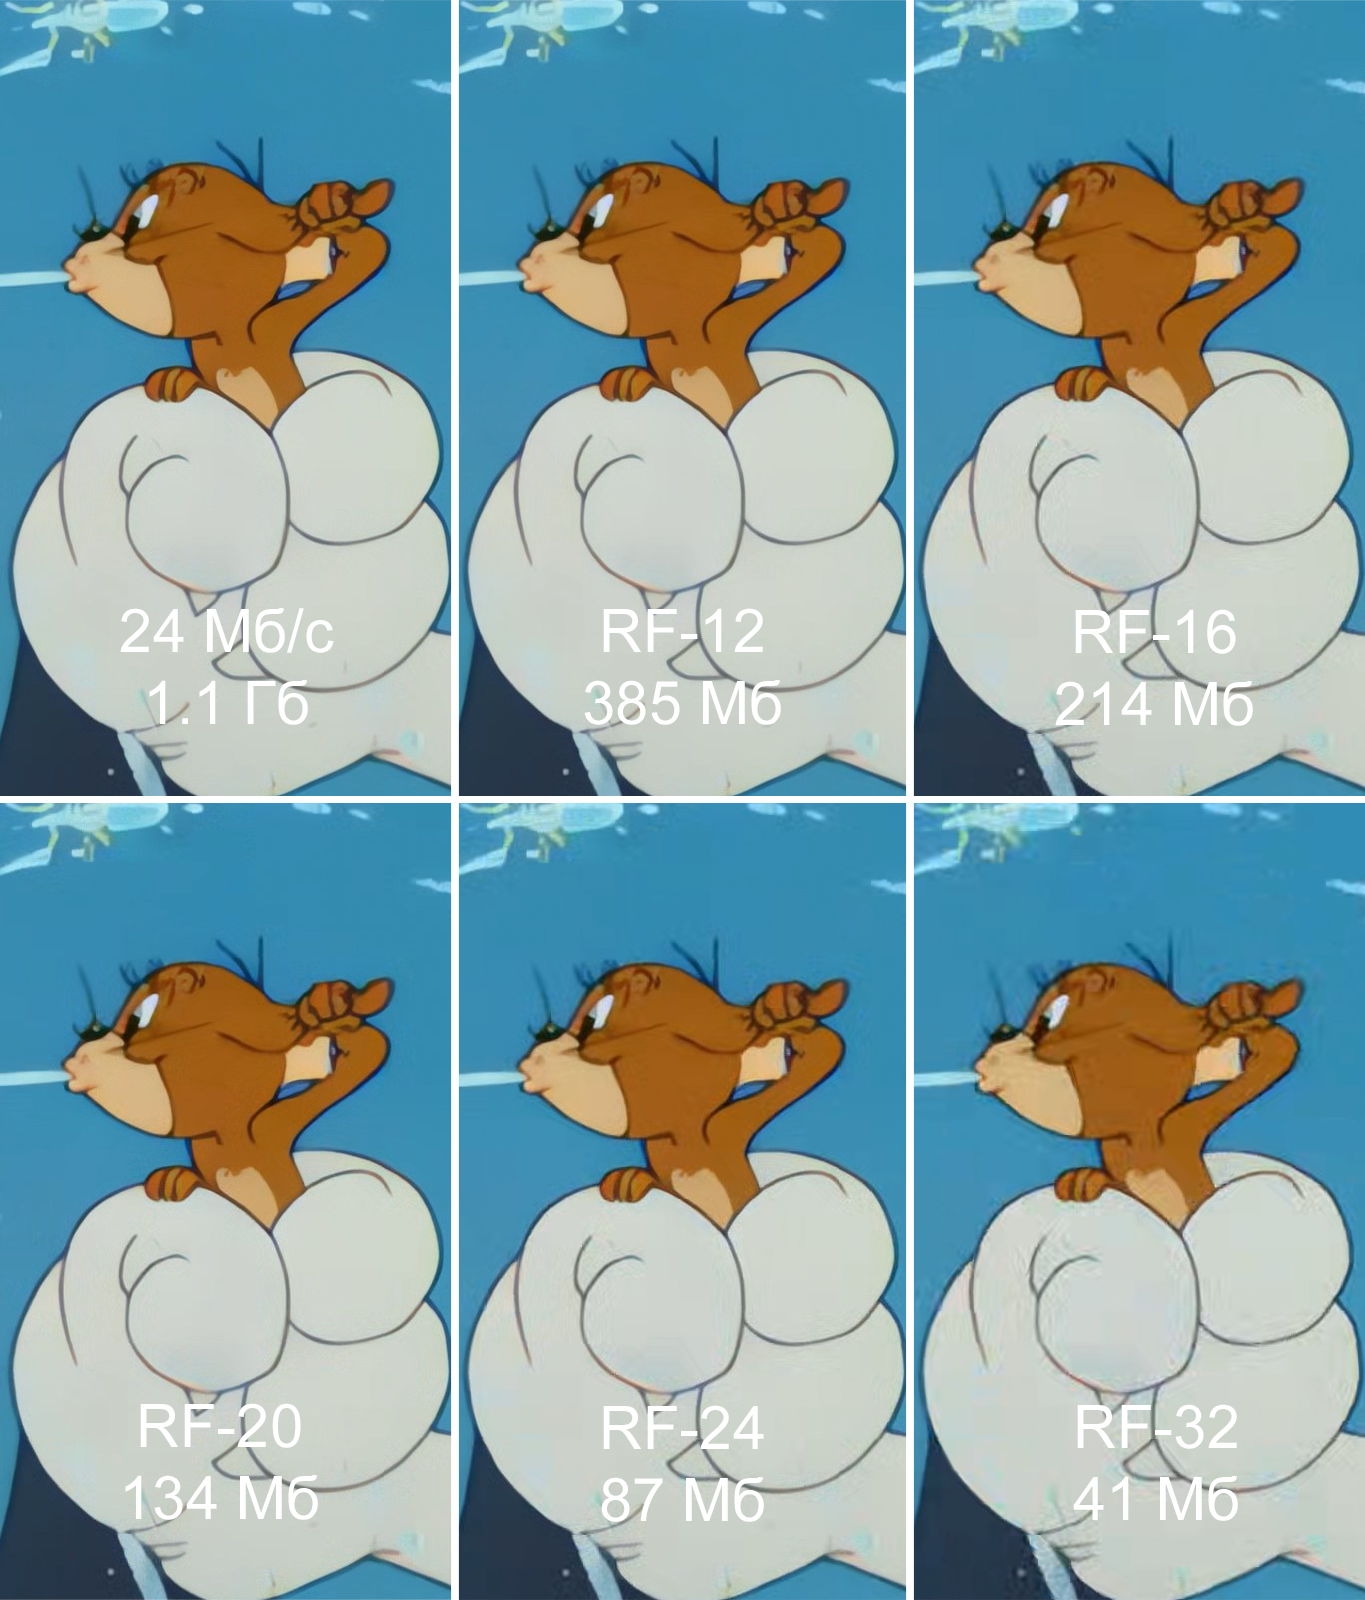
The constant quality threshold needs to be selected by yourself, since different cartoons have different levels of detail, and this parameter affects — unsurprisingly — the video quality. For Ultra HD video it might be too low, and for Full HD it might be too high or vice versa. You can also specify a constant bitrate manually, but I found that RF is simpler, since the episodes vary significantly in image resolution, and instead of guessing the bitrate each time, you can use RF which will produce consistently good results everywhere.
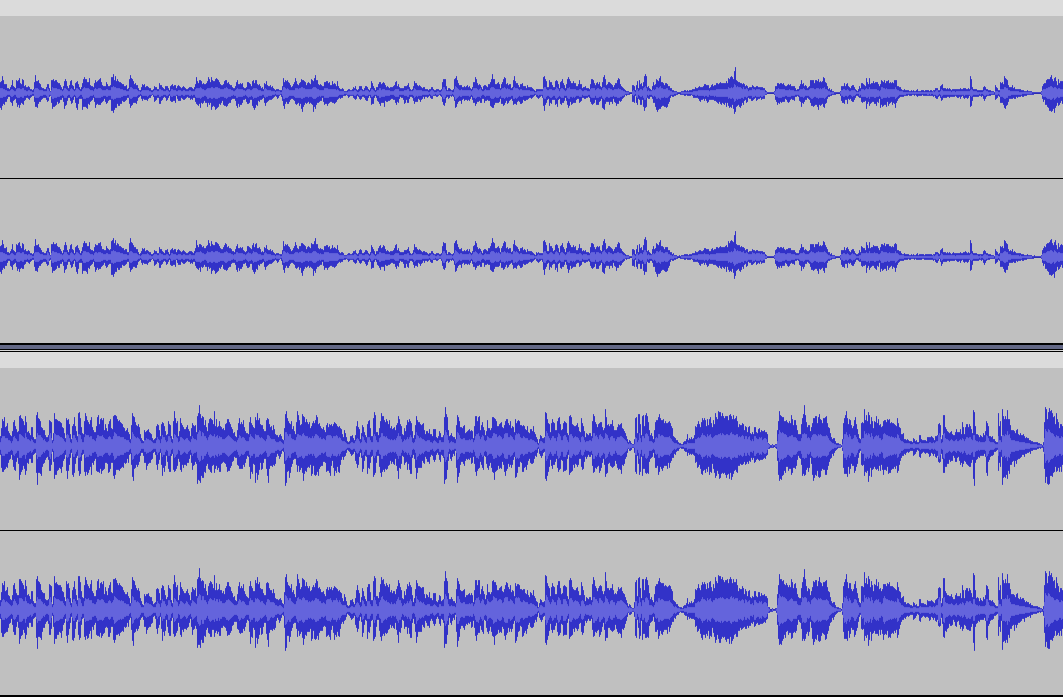
Examples of bitrate compression:
Now about packing the resulting files into .mkv containers. If you want to publish your work somewhere, this is quite an important step, since .mkv supports multiple audio tracks — for example, making a container with both English and Russian voiceover. Exactly my case. For this, we need the MKVToolNix utility. Drop in the resulting files (Russian voiceover and video with English voiceover) and set the audio track languages.
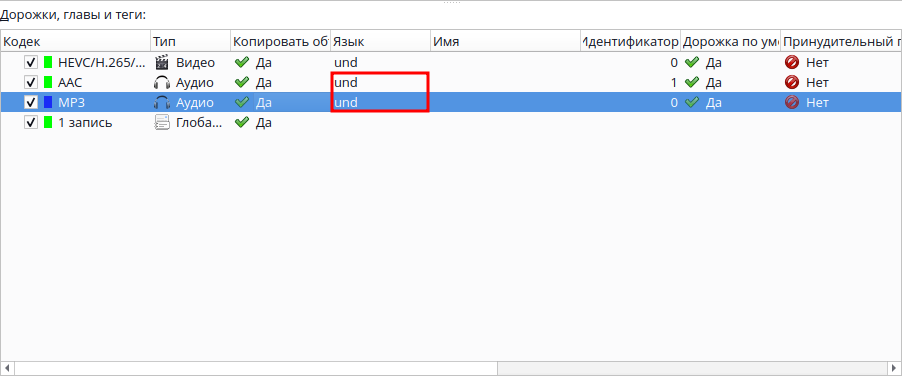
Click "Start Muxing."
In the end, all episodes were compressed from a total of ~190 GB down to ~60 GB, with absolutely minimal quality loss. The HandBrake step could have been avoided if I had experimented with the video bitrate setting during output configuration in Topaz Video AI from the start, but perhaps this mistake helped me achieve greater precision in color correction thanks to the higher image resolution. And no, the image dimensions in both variants are the same (1920x1440), but bitrate directly affects image compression — at 5 Mbps, the image will contain far less processable information than at 10 Mbps.
FAQ
What is this article about in one sentence?
This article explains the core idea in practical terms and focuses on what you can apply in real work.
Who is this article for?
It is written for engineers, technical leaders, and curious readers who want a clear, implementation-focused explanation.
What should I read next?
Use the related articles below to continue with closely connected topics and concrete examples.