Convex Guide. Part 2
Hello friends! In this series of articles I talk about Convex - a new open and free BaaS (Backend as a Service) solution that looks very promising and is quickly gaining popularity among developers. Today, Convex provides a mixed-mode reactive database, authentication/authorizati
Editor's Context
This article is an English adaptation with additional editorial framing for an international audience.
- Terminology and structure were localized for clarity.
- Examples were rewritten for practical readability.
- Technical claims were preserved with source attribution.
Source: original publication
Series Navigation
- Convex Guide. Part 1
- Convex Guide. Part 2 (Current)
Hello friends!
In this series of articles I talk about Convex - a new open and free BaaS (Backend as a Service) solution that looks very promising and is quickly gaining popularity among developers.
Today, Convex provides a mixed-mode reactive database, authentication/authorization mechanism, file storage, task scheduler, and smart search tools.
This is the second part of the series in which we will talk about authentication and authorization.
- First part
❯ Authentication
Authentication allows you to identify users and limit their access to data if necessary.
Convex Auth
Authentication can be implemented directly in Convex using the Convex Auth library, which we'll talk about in the next section. This is an easy way to set up user registration/authorization using authentication providers, one-time email/SMS or passwords.
Third Party Authentication Platforms
Alternatively, you can use Convex's integration with third-party authentication providers. It's a little more complex, but these platforms provide advanced functionality on top of the authentication basics:
- Clerk - newer platform with better support for Next.js and React Native
- Auth0 - a more stable platform with a huge number of possibilities
❯ Convex Auth
Convex Auth is a library for implementing authentication directly within Convex. It allows you to authenticate users without an authentication service or even a server.
Getting started
To create a new project with Convex and Convex Auth, you need to run the command:
npm create convex@latest
and choose React (Vite) And Convex Auth.
We'll talk about adding Convex Auth to an existing project later.
Review
Convex Auth allows you to implement the following authentication methods:
- Magic links and one-time passwords - sending a link or code by email.
- OAuth - authorization via Github / Google / Apple, etc.
- Passwords, including password reset and email confirmation.
The library does not provide ready-made UI components, but nothing prevents you from copying the code from the examples for rapid prototyping.
Please notethat Convex Auth is an experimental feature. This means that the corresponding code may undergo some changes in the future.
Add to an existing project
Install the necessary packages:
npm i @convex-dev/auth @auth/core
We run the command to initialize:
npx @convex-dev/auth
This command configures the project to authenticate using the library. This setting can be made manually.
Add authentication tables to the schema:
// convex/schema.ts
import { defineSchema } from 'convex/server'
import { authTables } from '@convex-dev/auth/server'

const schema = defineSchema({
  ...authTables,
  // Другие таблицы
})

export default schema
Adding an authentication provider differs depending on the framework you are using.
Vite
We replace ConvexProvider from convex/react on ConvexAuthProvider from @convex-dev/auth-react:
import { ConvexAuthProvider } from '@convex-dev/auth/react'
import React from 'react'
import ReactDOM from 'react-dom/client'
import { ConvexReactClient } from 'convex/react'
import App from './App.tsx'
import './index.css'

const convex = new ConvexReactClient(import.meta.env.VITE_CONVEX_URL as string)

ReactDOM.createRoot(document.getElementById('root')!).render(
  <React.StrictMode>
    <ConvexAuthProvider client={convex}>
      <App />
    </ConvexAuthProvider>
  </React.StrictMode>,
)
Next.js
We wrap the application in ConvexAuthNextjsServerProvider from @convex-dev/auth/nextjs/server:
// app/layout.tsx
import { ConvexAuthNextjsServerProvider } from '@convex-dev/auth/nextjs/server'

export default function RootLayout({
  children,
}: Readonly<{
  children: React.ReactNode
}>) {
  return (
    <ConvexAuthNextjsServerProvider>
      <html lang='en'>
        <body>{children}</body>
      </html>
    </ConvexAuthNextjsServerProvider>
  )
}
In the provider for the client we replace ConvexProvider from convex/react on ConvexAuthNextjsProvider from @convex-dev/auth/nextjs:
// app/ConvexClientProvider.tsx
'use client'

import { ConvexAuthNextjsProvider } from '@convex-dev/auth/nextjs'
import { ConvexReactClient } from 'convex/react'
import { ReactNode } from 'react'

const convex = new ConvexReactClient(process.env.NEXT_PUBLIC_CONVEX_URL!)

export function ConvexClientProvider({ children }: { children: ReactNode }) {
  return (
    <ConvexAuthNextjsProvider client={convex}>
      {children}
    </ConvexAuthNextjsProvider>
  )
}
You can wrap your entire application in a client provider:
// app/layout.tsx
import { ConvexAuthNextjsServerProvider } from '@convex-dev/auth/nextjs/server'
import { ConvexClientProvider } from './ConvexClientProvider'

export default function RootLayout({
  children,
}: Readonly<{
  children: React.ReactNode
}>) {
  return (
    <ConvexAuthNextjsServerProvider>
      <html lang='en'>
        <body>
          <ConvexClientProvider>{children}</ConvexClientProvider>
        </body>
      </html>
    </ConvexAuthNextjsServerProvider>
  )
}
Finally, add the file middleware.ts, which uses the function convexAuthNextjsMiddleware:
import { convexAuthNextjsMiddleware } from '@convex-dev/auth/nextjs/server'

export default convexAuthNextjsMiddleware()

export const config = {
  // Посредник запускается для всех роутов,
  // кроме статических ресурсов
  matcher: ['/((?!.*\\..*|_next).*)', '/', '/(api|trpc)(.*)'],
}
React Native
Install expo-secure-store:
npx expo install expo-secure-store
We replace ConvexProvider from convex/react on ConvexAuthProvider from @convex-dev/auth-react:
// app/_layout.tsx
import { ConvexAuthProvider } from '@convex-dev/auth/react'
import { ConvexReactClient } from 'convex/react'
import { Stack } from 'expo-router'
import * as SecureStore from 'expo-secure-store'

const convex = new ConvexReactClient(process.env.EXPO_PUBLIC_CONVEX_URL!, {
  unsavedChangesWarning: false,
})

const secureStorage = {
  getItem: SecureStore.getItemAsync,
  setItem: SecureStore.setItemAsync,
  removeItem: SecureStore.deleteItemAsync,
}

export default function RootLayout() {
  return (
    <ConvexAuthProvider client={convex} storage={secureStorage}>
      <Stack>
        <Stack.Screen name='index' />
      </Stack>
    </ConvexAuthProvider>
  )
}
OAuth
This authentication method includes 2 steps:
- The user clicks on a button to authorize with a third party (GitHub, Google, Apple, etc.).
- The user is authenticated at the third party site, directed back to the application, and logged in.
Convex Auth enables secure exchange of secrets between a third party provider and our backend.
Providers
Convex Auth is based on Auth.js.
Auth.js allows you to use 80 different OAuth providers.
Let's look at setting up OAuth using GitHub because it's the easiest.
Settings
Callback URL
After registering as a developer with a provider, we typically create an "app" to store OAuth settings.
Among other things, you usually need to configure a callback URL, as well as other URLs/domains.
The source (domain) of the callback URL for Convex Auth is the HTTP Actions URL, which can be found in the control panel. It matches CONVEX_URL, with the exception of the top level domain, which is .site, not .cloud.
For example, if the name of the deployment is fast-horse-123, then the HTTP Actions URL will look like https://fast-horse-123.convex.site, and the callback URL for GitHub is like this:
https://fast-horse-123.convex.site/api/auth/callback/github
Environment Variables
Example of setting environment variables for GitHub:
npx convex env set AUTH_GITHUB_ID yourgithubclientid
npx convex env set AUTH_GITHUB_SECRET yourgithubsecret
You can read more about setting environment variables in Convex Here.
Provider setup
Add provider settings to the array providers in the file convex/auth.ts:
import GitHub from '@auth/core/providers/github'
import { convexAuth } from '@convex-dev/auth/server'

export const { auth, signIn, signOut, store } = convexAuth({
  providers: [GitHub],
})
Adding a login button
The authorization flow is started using the function signInreturned by the hook useAuthActions.
The first argument of the function is the provider ID - its name in lowercase (default):
import { useAuthActions } from '@convex-dev/auth/react'

export function SignIn() {
  const { signIn } = useAuthActions()

  return (
    <button onClick={() => void signIn('github')}>
      Войти с помощью GitHub
    </button>
  )
}
Retrieving user data
Default in table users only saved name, email And image user.
This can be changed using the method profile in the provider settings:
import GitHub from '@auth/core/providers/github'
import { convexAuth } from '@convex-dev/auth/server'

export const { auth, signIn, signOut, store } = convexAuth({
  providers: [
    GitHub({
      profile(githubProfile, tokens) {
        return {
          id: githubProfile.id,
          name: githubProfile.name,
          email: githubProfile.email,
          image: githubProfile.picture,
          githubId: githubProfile.id,
        }
      },
    }),
  ],
})
The example adds a field githubId. Don't forget to modify your database schema accordingly.
profile() must return the field id with a unique ID that is used to identify the account.
Passwords
This authentication method is based on the user's secret password.
Password-based solid authentication involves a way to reset the password (usually via email or code).
You may also need to confirm your email (during registration or after) to ensure the correctness of your email.
Settings
Authorization using email (or username) and password is implemented using the provider settings Password.
Setting up a provider:
import { Password } from '@convex-dev/auth/providers/Password'
import { convexAuth } from '@convex-dev/auth/server'

export const { auth, signIn, signOut, store } = convexAuth({
  providers: [Password],
})
After this, you can trigger authorization/registration when submitting the form using the function signIn.
Registration and authorization are two different things. Which process is running is determined by the field flow:
import { useAuthActions } from '@convex-dev/auth/react'

export function SignIn() {
  const { signIn } = useAuthActions()
  // Регистрация или авторизация?
  const [step, setStep] = useState<'signUp' | 'signIn'>('signIn')

  return (
    <form
      onSubmit={(event) => {
        event.preventDefault()
        const formData = new FormData(event.currentTarget)
        void signIn('password', formData)
      }}
    >
      <input name='email' placeholder='Email' type='text' />
      <input name='password' placeholder='Password' type='password' />
      // Регистрация или авторизация? formaData.get("step")
      <input name='flow' value={step} type='hidden' />
      <button type='submit'>
        {step === 'signIn' ? 'Войти' : 'Зарегистрироваться'}
      </button>
      <button
        type='button'
        onClick={() => {
          setStep(step === 'signIn' ? 'signUp' : 'signIn')
        }}
      >
        {step === 'signIn' ? 'Регистрация' : 'Вход'}
      </button>
    </form>
  )
}
Reset your password using email
Resetting your password using email includes 2 steps:
- The user requests a password reset link via email.
- The user follows the link or enters the code on the site and enters a new password.
Provider Password supports password reset via setting reset, which accepts the email provider.
Create a custom email provider:
import Resend from '@auth/core/providers/resend'
import { Resend as ResendAPI } from 'resend'
import { alphabet, generateRandomString } from 'oslo/crypto'

export const ResendOTPPasswordReset = Resend({
  id: 'resend-otp',
  apiKey: process.env.AUTH_RESEND_KEY,
  async generateVerificationToken() {
    return generateRandomString(8, alphabet('0-9'))
  },
  async sendVerificationRequest({ identifier: email, provider, token }) {
    const resend = new ResendAPI(provider.apiKey)
    const { error } = await resend.emails.send({
      from: 'My App <onboarding@resend.dev>',
      to: [email],
      subject: 'Сброс пароля',
      text: `Код для сброса пароля: ${token}`,
    })

    if (error) {
      throw new Error('При отправке ссылки для сброса пароля произошла ошибка')
    }
  },
})
And we use it in convex/auth.ts:
import { Password } from '@convex-dev/auth/providers/Password'
import { convexAuth } from '@convex-dev/auth/server'
import { ResendOTPPasswordReset } from './ResendOTPPasswordReset'

export const { auth, signIn, signOut, store } = convexAuth({
  providers: [Password({ reset: ResendOTPPasswordReset })],
})
The password reset thread is identified using the values "reset" And "reset-verification" settings flow functions signIn:
import { useAuthActions } from '@convex-dev/auth/react'

export function PasswordReset() {
  const { signIn } = useAuthActions()
  const [step, setStep] = useState<'forgot' | { email: string }>('forgot')

  return step === 'forgot' ? (
    <form
      onSubmit={(event) => {
        event.preventDefault()
        const formData = new FormData(event.currentTarget)
        void signIn('password', formData).then(() =>
          setStep({ email: formData.get('email') as string }),
        )
      }}
    >
      <input name='email' placeholder='Email' type='text' />
      // Начинаем сброс
      <input name='flow' value='reset' type='hidden' />
      <button type='submit'>Отправить код</button>
    </form>
  ) : (
    <form
      onSubmit={(event) => {
        event.preventDefault()
        const formData = new FormData(event.currentTarget)
        void signIn('password', formData)
      }}
    >
      <input name='email' value={step.email} type='hidden' />
      // Код
      <input name='code' placeholder='Code' type='text' />
      // Новый пароль
      <input name='newPassword' placeholder='New password' type='password' />
      // Завершаем сброс
      <input name='flow' value='reset-verification' type='hidden' />
      <button type='submit'>Продолжить</button>
      <button type='button' onClick={() => setStep('signIn')}>
        Отмена
      </button>
    </form>
  )
}
Confirmation email
Provider Password supports email confirmation via setting verify, receiving email provider.
Create a custom email provider:
import Resend from '@auth/core/providers/resend'
import { Resend as ResendAPI } from 'resend'
import { alphabet, generateRandomString } from 'oslo/crypto'

export const ResendOTP = Resend({
  id: 'resend-otp',
  apiKey: process.env.AUTH_RESEND_KEY,
  async generateVerificationToken() {
    return generateRandomString(8, alphabet('0-9'))
  },
  async sendVerificationRequest({ identifier: email, provider, token }) {
    const resend = new ResendAPI(provider.apiKey)
    const { error } = await resend.emails.send({
      from: 'My App <onboarding@resend.dev>',
      to: [email],
      subject: 'Подтверждение email',
      text: `Ваш код: ${token}`,
    })

    if (error) {
      throw new Error(
        'При отправке ссылки для подтверждения email возникла ошибка',
      )
    }
  },
})
And we use it in convex/auth.ts:
import { Password } from '@convex-dev/auth/providers/Password'
import { convexAuth } from '@convex-dev/auth/server'
import { ResendOTP } from './ResendOTP'

export const { auth, signIn, signOut, store } = convexAuth({
  providers: [Password({ verify: ResendOTP })],
})
signIn() returns a Boolean value that is an indicator of successful authorization. In the following example, we do not check this, since we assume that the component will be completely unmounted after user authorization:
import { useAuthActions } from '@convex-dev/auth/react'

export function SignIn() {
  const { signIn } = useAuthActions()
  const [step, setStep] = useState<'signIn' | 'signUp' | { email: string }>(
    'signIn',
  )

  return step === 'signIn' || step === 'signUp' ? (
    <form
      onSubmit={(event) => {
        event.preventDefault()
        const formData = new FormData(event.currentTarget)
        void signIn('password', formData).then(() =>
          setStep({ email: formData.get('email') as string }),
        )
      }}
    >
      <input name='email' placeholder='Email' type='text' />
      <input name='password' placeholder='Password' type='password' />
      <input name='flow' value={step} type='hidden' />
      <button type='submit'>
        {step === 'signIn' ? 'Войти' : 'Зарегистрироваться'}
      </button>
      <button
        type='button'
        onClick={() => {
          setStep(step === 'signIn' ? 'signUp' : 'signIn')
        }}
      >
        {step === 'signIn' ? 'Регистрация' : 'Вход'}
      </button>
    </form>
  ) : (
    <form
      onSubmit={(event) => {
        event.preventDefault()
        const formData = new FormData(event.currentTarget)
        void signIn('password', formData)
      }}
    >
      <input name='code' placeholder='Code' type='text' />
      <input name='email' value={step.email} type='hidden' />
      <button type='submit'>Продолжить</button>
      <button type='button' onClick={() => setStep('signIn')}>
        Отмена
      </button>
    </form>
  )
}
Validation of email and password
To validate user input, you can use the following solutions:
- Zod to validate email and password length, as well as distribute logic between client and server
- haveibeenpwned to check email leak
- zxcvbn-ts to check the strength of the password
To do this, just pass the setting profile to the provider Password.
Zod usage example:
import { Password } from '@convex-dev/auth/providers/Password'
import { z } from 'zod'

const ParamsSchema = z.object({
  email: z.string().email(),
  password: z.string().min(16),
})

export default Password({
  profile(params) {
    const { error, data } = ParamsSchema.safeParse(params)
    if (error) {
      throw new ConvexError(error.format())
    }
    return { email: data.email }
  },
})
Authorization
Authorization
Authorization depends on the selected authentication method.
Logout
To log out of the system, use the function signOut:
import { useAuthActions } from '@convex-dev/auth/react'

export function SignOut() {
  const { signOut } = useAuthActions()

  return <button onClick={signOut}>Выход</button>
}
Authorization status
convex/react provides components for checking the user's authorization status:
import { Authenticated, Unauthenticated, AuthLoading } from 'convex/react'
import { SignIn } from './SignIn'
import { SignOut } from './SignOut'

export function App() {
  return (
    <>
      <AuthLoading>{/* Индикатор загрузки */}</AuthLoading>
      <Unauthenticated>
        <SignIn />
      </Unauthenticated>
      <Authenticated>
        <SignOut />
        <Content />
      </Authenticated>
    </>
  )
}

function Content() {
  /* Защищенный контент */
}
HTTP Transaction Authentication
Authentication of HTTP operation calls requires a JWT token, which is returned by the hook useAuthToken:
import { useAuthToken } from '@convex-dev/auth/react'

function SomeComponent() {
  const token = useAuthToken()

  const onClick = async () => {
    const response = await fetch(
      `${process.env.VITE_CONVEX_SITE_URL!}/someEndpoint`,
      // Передаем токен в заголовке авторизации
      { headers: { Authorization: `Bearer ${token}` } },
    )
    // ...
  }
  // ...
}
Using Authentication State in Backend Functions
Information about the currently authorized user in Convex functions can be accessed using helper functions from @convex-dev/auth/server.
Functions getAuthUserId And getAuthSessionId under the hood use a built-in function ctx.auth.getUserIdentity and provide a typed api.
Data model
Convex Auth creates tables users And authSession.
When a user registers, a document is created in the table users.
When a user is authorized, a document is created in the table authSessions. This document is deleted after the session expires or the user logs out.
One user can have several active sessions simultaneously. For web applications, one session is distributed across all browser tabs by default.
Obtaining an authorized user ID
To obtain the authorized user ID, call getAuthUserId() with argument ctx:
import { getAuthUserId } from '@convex-dev/auth/server'
import { query } from './_generated/server'

export const currentUser = query({
  args: {},
  handler: async (ctx) => {
    const userId = await getAuthUserId(ctx)
    if (userId === null) {
      return null
    }
    return await ctx.db.get(userId)
  },
})
Getting the current session ID
To get the current session ID, call getAuthSessionId() with argument ctx:
import { getAuthSessionId } from '@convex-dev/auth/server'
import { query } from './_generated/server'

export const currentSession = query({
  args: {},
  handler: async (ctx) => {
    const sessionId = await getAuthSessionId(ctx)
    if (sessionId === null) {
      return null
    }
    return await ctx.db.get(sessionId)
  },
})
Server Authentication in Next.js
Route protection
By default, all routes are accessible without authentication. You can protect routes from unauthorized access in the file middleware.ts:
import {
  convexAuthNextjsMiddleware,
  createRouteMatcher,
  isAuthenticatedNextjs,
  nextjsMiddlewareRedirect,
} from '@convex-dev/auth/nextjs/server'

const isSignInPage = createRouteMatcher(['/signin'])
const isProtectedRoute = createRouteMatcher(['/product(.*)'])

export default convexAuthNextjsMiddleware((request) => {
  if (isSignInPage(request) && isAuthenticatedNextjs()) {
    return nextjsMiddlewareRedirect(request, '/product')
  }
  if (isProtectedRoute(request) && !isAuthenticatedNextjs()) {
    return nextjsMiddlewareRedirect(request, '/signin')
  }
})

export const config = {
  // Посредник запускается для всех роутов,
  // кроме статических ресурсов
  matcher: ['/((?!.*\\..*|_next).*)', '/', '/(api|trpc)(.*)'],
}
Convex Auth provides API and helper functions to implement the mediator:
createRouteMatcheris a function that uses the same syntax asconfigintermediary. We call it with a list of patterns, and it returns a function that returns the passedNextRequestif the route matches- function
isAuthenticatedNextjsreturns an indicator of the authorization of the request. When usingConvexAuthNextjsServerProviderThe authentication state is stored both in http-only cookies and on the client, so it is also available on page requests - function
nextjsMiddlewareRedirect- shorthand for running redirects
export function nextjsMiddlewareRedirect(
  request: NextRequest,
  pathname: string,
) {
  const url = request.nextUrl.clone()
  url.pathname = pathname
  return NextResponse.redirect(url)
}
Preload and normal loading of data
For preliminary and regular loading of data on the Next.js server from the Convex backend, the functions preloadQuery And fetchQuery, and also the function convexAuthNextjsToken:
import { convexAuthNextjsToken } from '@convex-dev/auth/nextjs/server'
import { preloadQuery } from 'convex/nextjs'
import { api } from '@/convex/_generated/api'
import { Tasks } from './Tasks'

export async function TasksWrapper() {
  const preloadedTasks = await preloadQuery(
    api.tasks.list,
    { list: 'default' },
    { token: convexAuthNextjsToken() },
  )
  return <Tasks preloadedTasks={preloadedTasks} />
}
Calling authenticated mutations and operations
Mutations and operations can be called from Next.js server actions, as well as from POST and PUT route handlers:
import { api } from '@/convex/_generated/api'
import { fetchMutation, fetchQuery } from 'convex/nextjs'
import { revalidatePath } from 'next/cache'

export default async function PureServerPage() {
  const tasks = await fetchQuery(api.tasks.list, { list: 'default' })

  async function createTask(formData: FormData) {
    'use server'

    await fetchMutation(
      api.tasks.create,
      {
        text: formData.get('text') as string,
      },
      { token: convexAuthNextjsToken() },
    )
    revalidatePath('/example')
  }

  return <form action={createTask}>...</form>
}
❯ Clerk
Clerk is an authentication platform that provides authorization through passwords, third-party providers, one-time email or SMS, multi-factor authentication and user management.
Getting started
We assume we have a working React application with Convex.
Register with Clerk
We create an application there
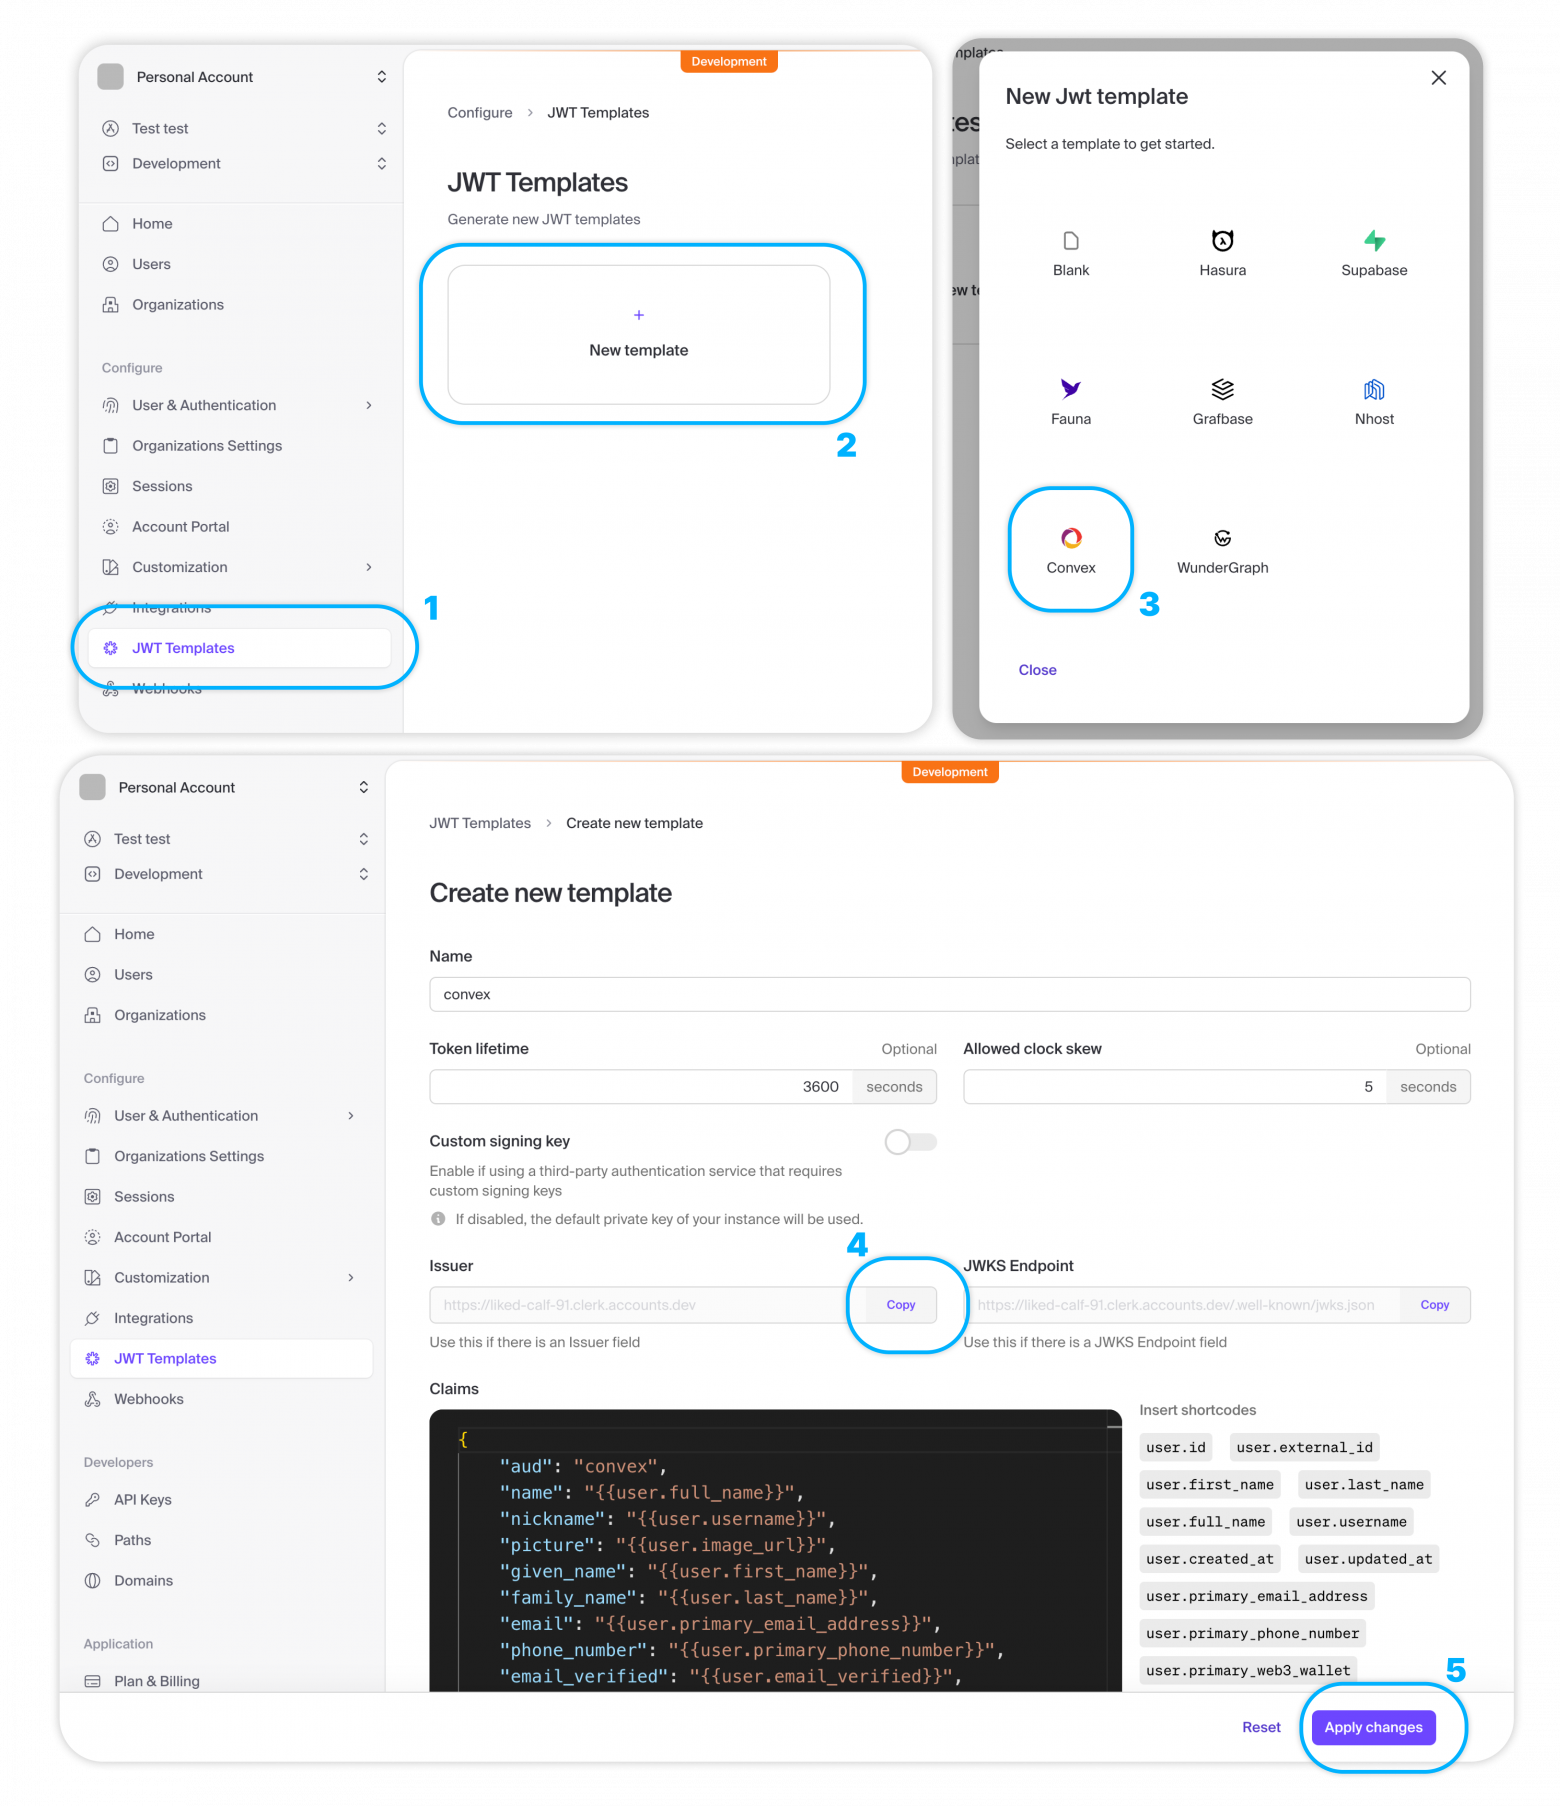
Creating a JWT Template
In the JWT Templates section, click on New template and select Convex.
Copy Issuer URL.
Click Apply Changes.
Please note: JWT token should be called convex.
Creating an authentication setup
In the directory convex create a file auth.config.ts with server settings for validating access tokens:
export default {
  providers: [
    {
      // Issuer URL
      domain: "https://your-issuer-url.clerk.accounts.dev/",
      applicationID: "convex",
    },
  ]
};
Deploying the changes
npx convex dev
Installing Clerk
npm install @clerk/clerk-react
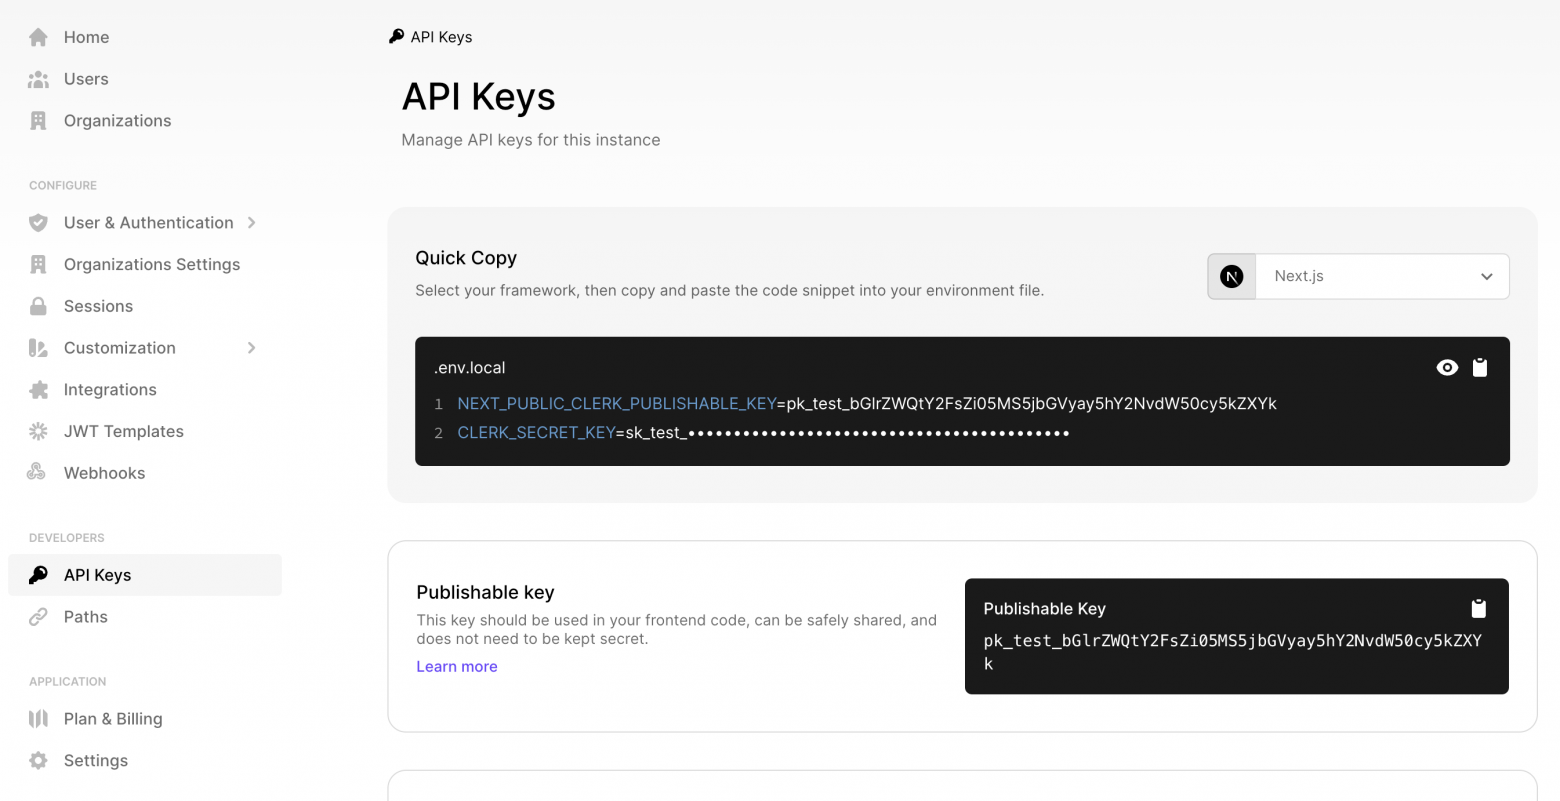
Getting the Publishable key in the Clerk control panel
Setting up ConvexProviderWithClerk
// src/main.tsx
import React from "react";
import ReactDOM from "react-dom/client";
import App from "./App";
import "./index.css";
import { ClerkProvider, useAuth } from "@clerk/clerk-react";
import { ConvexProviderWithClerk } from "convex/react-clerk";
import { ConvexReactClient } from "convex/react";

const convex = new ConvexReactClient(import.meta.env.VITE_CONVEX_URL as string);

ReactDOM.createRoot(document.getElementById("root")!).render(
  <React.StrictMode>
    <ClerkProvider publishableKey="pk_test_...">
      <ConvexProviderWithClerk client={convex} useAuth={useAuth}>
        <App />
      </ConvexProviderWithClerk>
    </ClerkProvider>
  </React.StrictMode>,
);
Display UI depending on authentication status
convex/react And @clerk/clerk-react provide ready-made components for managing user authentication state:
import { SignInButton, UserButton } from "@clerk/clerk-react";
import { Authenticated, Unauthenticated, useQuery } from "convex/react";
import { api } from "../convex/_generated/api";

function App() {
  return (
    <main>
      <Unauthenticated>
        <SignInButton />
      </Unauthenticated>
      <Authenticated>
        <UserButton />
        <Content />
      </Authenticated>
    </main>
  );
}

function Content() {
  const messages = useQuery(api.messages.getForCurrentUser);

  return <div>Защищенный контент: {messages?.length}</div>;
}

export default App;
Using Authentication State in Convex Functions
If the user is authenticated, their information is stored in the JWT and is accessible via ctx.auth.getUserIdentity().
If the user is not authenticated, ctx.auth.getUserIdentity() returns null.
import { query } from "./_generated/server";

export const getForCurrentUser = query({
  args: {},
  handler: async (ctx) => {
    const identity = await ctx.auth.getUserIdentity();
    if (identity === null) {
      throw new Error("Unauthorized");
    }

    return await ctx.db
      .query("messages")
      .filter((q) => q.eq(q.field("author"), identity.email))
      .collect();
  },
});
Authorization and logout
To create an authorization flow, the component is used SignInButton. When clicked, the Clerk authorization modal window opens:
import { SignInButton } from "@clerk/clerk-react";

function App() {
  return (
    <div className="App">
      <SignInButton mode="modal" />
    </div>
  );
}
The logout flow uses the component SignOutButton or UserButton, which opens a modal with the corresponding button.
Authorized and unauthorized displays
To check the user's authorization state, you should use a hook useConvexAuth instead of a hook useAuth from Clerk. useConvexAuth() checks that the browser has received the authentication token necessary to make requests to the Convex backend, and also that the backend has validated it:
import { useConvexAuth } from "convex/react";

function App() {
  const { isLoading, isAuthenticated } = useConvexAuth();

  return (
    <div className="App">
      {isAuthenticated ? "Авторизован" : "Не авторизован"}
    </div>
  );
}
You can also use auxiliary components Authenticated, Unauthenticated And AuthLoading instead of the Clerk components of the same name. These components use the hook useConvex under the hood:
import { Authenticated, Unauthenticated, AuthLoading } from "convex/react";

function App() {
  return (
    <div className="App">
      <Authenticated>Авторизован</Authenticated>
      <Unauthenticated>Не авторизован</Unauthenticated>
      <AuthLoading>Загрузка...</AuthLoading>
    </div>
  );
}
User information in React
User data can be accessed using a hook useAuth from Clerk:
import { useUser } from "@clerk/clerk-react";

export default function Badge() {
  const { user } = useUser();
  return <span>Авторизован как {user.fullName}</span>;
}
Under the hood
The authentication flow under the hood looks like this:
- The user clicks the authorization button.
- The user is redirected to a page where he logs in using the method configured in Clerk.
- After successful authorization, Clerk directs the user back to the application to the authorization page or another page specified in the prop.
afterSignIn. ClerkProvidernow knows that the user is authenticated.ConvexProviderWithClerkreceives an authentication token from Clerk.ConvexReactClientpasses this token to the Convex backend for validation.- Convex receives the public key from Clerk to validate the token signature.
ConvexReactClientnotified of successful authentication andConvexProviderWithClerknow knows that the user is authenticated in Convex. HookuseConvexAuthreturnsisAuthenticated: trueand componentAuthenticatedrenders its children.
ConvexProviderWithClerk takes care of obtaining a token when necessary so that the user remains authenticated in Convex.
❯ Auth0
Auth0 is an authentication platform that provides authorization through passwords, third-party providers, one-time email or SMS, multi-factor authentication, SSO and user management.
In general, setting up authentication with Auth0 is similar to setting up authentication with Clerk, except some features.
❯ Authentication in functions
Information about the currently authorized user in Convex functions can be accessed using the property auth object QueryCtx, MutationCtx or ActionCtx:
import { mutation } from "./_generated/server";

export const myMutation = mutation({
  args: {
    // ...
  },
  handler: async (ctx, args) => {
    const identity = await ctx.auth.getUserIdentity();
    if (identity === null) {
      throw new Error("Unauthorized");
    }
    //...
  },
});
UserIdentity
Object UserIdentity, returned getUserIdentity(), guaranteed to contain fields tokenIdentifier, subject And issuer. The presence of other fields depends on the authentication provider used, as well as the settings for JWT tokens and OpenID areas.
tokenIdentifier is a combination subject And issuer, which ensures ID uniqueness, even when using multiple providers.
import { mutation } from "./_generated/server";

export const myMutation = mutation({
  args: {
    // ...
  },
  handler: async (ctx, args) => {
    const identity = await ctx.auth.getUserIdentity();
    const { tokenIdentifier, name, email } = identity!;
    //...
  },
});
HTTP Operations
getUserIdentity() also allows you to access user data in HTTP operations to call api endpoints with the correct header Authorization:
const jwtToken = "...";

fetch("https://<deployment name>.convex.site/myAction", {
  headers: {
    Authorization: `Bearer ${jwtToken}`,
  },
});
❯ User data storage
Please note: When using Convex Auth, user data is automatically saved in the Convex database.
It may be necessary to store user information in the Convex database for the following reasons:
- our functions need information about other users, not just the currently authorized one
- functions need access to information additional to the fields available in Open ID Connect JWT
There are 2 ways to store information about users in the database (only the second allows you to store information not contained in JWT):
- Call mutation to save information from JWT available in
ctx.auth. - Implementation of a webhook called by the authentication provider when user information changes.
Calling mutation on the client
User table schema (optional)
You can define a table "users", and also, optionally, an index for effectively searching for users in the database.
In the following example we use tokenIdentifier from ctx.auth.getUserIdentity() to identify the user, but with the same success you can use subject or even email.
// convex/schema.ts
users: defineTable({
  name: v.string(),
  tokenIdentifier: v.string(),
}).index("by_token", ["tokenIdentifier"]),
Mutation to save current user
// convex/users.ts
import { mutation } from "./_generated/server";

export const store = mutation({
  args: {},
  handler: async (ctx) => {
    const identity = await ctx.auth.getUserIdentity();
    if (!identity) {
      throw new Error("Called storeUser without authentication present");
    }

    // Проверяем наличие данных пользователя.
    // Обратите внимание: вместо индекса можно использовать
    // ctx.db.query("users")
    //  .filter(q => q.eq(q.field("tokenIdentifier"), identity.tokenIdentifier))
    //  .unique();
    const user = await ctx.db
      .query("users")
      .withIndex("by_token", (q) =>
        q.eq("tokenIdentifier", identity.tokenIdentifier),
      )
      .unique();
    if (user !== null) {
      // Обновляем имя пользователя при необходимости
      if (user.name !== identity.name) {
        await ctx.db.patch(user._id, { name: identity.name });
      }
      return user._id;
    }
    // Создаем нового пользователя
    return await ctx.db.insert("users", {
      name: identity.name ?? "Анонимус",
      tokenIdentifier: identity.tokenIdentifier,
    });
  },
});
Calling mutation from React
Custom hook that causes a mutation after authorization:
// src/useStoreUserEffect.ts
import { useUser } from "@clerk/clerk-react";
import { useConvexAuth } from "convex/react";
import { useEffect, useState } from "react";
import { useMutation } from "convex/react";
import { api } from "../convex/_generated/api";
import { Id } from "../convex/_generated/dataModel";

export function useStoreUserEffect() {
  const { isLoading, isAuthenticated } = useConvexAuth();
  const { user } = useUser();
  // Установка этого состояния означает сохранение пользователя на сервере
  const [userId, setUserId] = useState<Id<"users"> | null>(null);
  const storeUser = useMutation(api.users.store);
  // Вызываем мутацию `storeUser` для сохранения
  // текущего пользователя в таблице `users` и возврата его ИД
  useEffect(() => {
    // Если пользователь не авторизован, ничего не делаем
    if (!isAuthenticated) {
      return;
    }
    // Сохраняем пользователя в БД.
    // `storeUser()` получает данные пользователя через объект `auth`
    // на сервере. Вручную ничего передавать не нужно
    async function createUser() {
      const id = await storeUser();
      setUserId(id);
    }
    createUser();
    return () => setUserId(null);
    // Перезапускаем хук при авторизации пользователя через
    // другого провайдера
  }, [isAuthenticated, storeUser, user?.id]);
  // Комбинируем локальное состояние с состоянием из контекста
  return {
    isLoading: isLoading || (isAuthenticated && userId === null),
    isAuthenticated: isAuthenticated && userId !== null,
  };
}
We use this hook in the top-level component:
// src/App.tsx
import { SignInButton, UserButton } from "@clerk/clerk-react";
import { useQuery } from "convex/react";
import { api } from "../convex/_generated/api";
import { useStoreUserEffect } from "./useStoreUserEffect.js";

function App() {
  const { isLoading, isAuthenticated } = useStoreUserEffect();

  return (
    <main>
      {isLoading ? (
        <>Загрузка...</>
      ) : !isAuthenticated ? (
        <SignInButton />
      ) : (
        <>
          <UserButton />
          <Content />
        </>
      )}
    </main>
  );
}

function Content() {
  const messages = useQuery(api.messages.getForCurrentUser);

  return <div>Защищенный контент: {messages?.length}</div>;
}

export default App;
In this case useStoreUserEffect() replaces useConvexAuth().
Using a User ID
After saving the user's data, his ID can be used as a foreign key in other documents:
import { v } from "convex/values";
import { mutation } from "./_generated/server";

export const send = mutation({
  args: { body: v.string() },
  handler: async (ctx, args) => {
    const identity = await ctx.auth.getUserIdentity();
    if (!identity) {
      throw new Error("Unauthorized");
    }
    const user = await ctx.db
      .query("users")
      .withIndex("by_token", (q) =>
        q.eq("tokenIdentifier", identity.tokenIdentifier),
      )
      .unique();
    if (!user) {
      throw new Error("Unauthorized");
    }
    await ctx.db.insert("messages", { body: args.body, user: user._id });
    // ...
  },
});
Loading a user by ID
import { query } from "./_generated/server";

export const list = query({
  args: {},
  handler: async (ctx) => {
    const messages = await ctx.db.query("messages").collect();

    return Promise.all(
      messages.map(async (message) => {
        // Для каждого сообщения извлекаем написавшего его
        // пользователя и добавляем его имя в поле `author`
        const user = await ctx.db.get(message.user);
        return {
          author: user?.name ?? "Анонимус",
          ...message,
        };
      }),
    );
  },
});
Installing a webhook
We will use Clerk, but in Auth0 similar process.
In this case, Clerk will call the Convex backend via an HTTP endpoint when a user registers, updates or deletes his account.
Setting up a webhook endpoint
On the Clerk control panel, go to Webhooks and click "+ Add Endpoint".
Set Endpoint URL to value https://<название-деплоя>.convex.site/clerk-users-webhook (note that the domain ends with .site, not on .cloud). The name of the deployment can be found in the file .env.local in the project directory or in the Convex control panel as part of the Deployment URL.
In Message Filtering, select user for all user events.
Click Create.
After saving the endpoint, copy the Signing Secret, which should start with whsec_. Set it as the value of the environment variable CLERK_WEBHOOK_SECRET in the Convex control panel.
User table schema (optional)
You can define a table "users", and also, optionally, an index for effectively searching for users in the database:
users: defineTable({
  name: v.string(),
  // Это Clerk ID, хранящийся в поле `subject` JWT
  externalId: v.string(),
}).index("byExternalId", ["externalId"]),
Mutations for inserting and deleting users
// convex/users.ts
import { internalMutation, query, QueryCtx } from "./_generated/server";
import { UserJSON } from "@clerk/backend";
import { v, Validator } from "convex/values";

// Передает данные юзера клиенту для определения
// успешности выполнения веб-хука
export const current = query({
  args: {},
  handler: async (ctx) => {
    return await getCurrentUser(ctx);
  },
});

// Вызывается при регистрации юзера или обновлении его аккаунта
export const upsertFromClerk = internalMutation({
  args: { data: v.any() as Validator<UserJSON> }, // валидации нет, мы доверяем Clerk
  async handler(ctx, { data }) {
    const userAttributes = {
      name: `${data.first_name} ${data.last_name}`,
      externalId: data.id,
    };

    const user = await userByExternalId(ctx, data.id);
    if (user === null) {
      await ctx.db.insert("users", userAttributes);
    } else {
      await ctx.db.patch(user._id, userAttributes);
    }
  },
});

// Вызывается при удалении пользователя
export const deleteFromClerk = internalMutation({
  args: { clerkUserId: v.string() },
  async handler(ctx, { clerkUserId }) {
    const user = await userByExternalId(ctx, clerkUserId);

    if (user !== null) {
      await ctx.db.delete(user._id);
    } else {
      console.warn(
        `Невозможно удалить пользователя, отсутствует его Clerk ID: ${clerkUserId}`,
      );
    }
  },
});

// Возвращает данные текущего авторизованного пользователя
// или выбрасывает исключение
export async function getCurrentUserOrThrow(ctx: QueryCtx) {
  const userRecord = await getCurrentUser(ctx);
  if (!userRecord) {
    throw new Error("Пользователь отсутствует");
  }
  return userRecord;
}

// Возвращает данные текущего авторизованного пользователя или `null`
export async function getCurrentUser(ctx: QueryCtx) {
  const identity = await ctx.auth.getUserIdentity();
  if (identity === null) {
    return null;
  }
  return await userByExternalId(ctx, identity.subject);
}

// Извлекает данные юзера по Clerk ID
async function userByExternalId(ctx: QueryCtx, externalId: string) {
  return await ctx.db
    .query("users")
    .withIndex("byExternalId", (q) => q.eq("externalId", externalId))
    .unique();
}
Webhook endpoint
// convex/http.ts
import { httpRouter } from "convex/server";
import { httpAction } from "./_generated/server";
import { internal } from "./_generated/api";
import type { WebhookEvent } from "@clerk/backend";
import { Webhook } from "svix";

const http = httpRouter();

http.route({
  path: "/clerk-users-webhook",
  method: "POST",
  handler: httpAction(async (ctx, request) => {
    const event = await validateRequest(request);
    if (!event) {
      return new Response("Возникла ошибка", { status: 400 });
    }
    switch (event.type) {
      case "user.created": // намеренное "проваливание"
      case "user.updated":
        await ctx.runMutation(internal.users.upsertFromClerk, {
          data: event.data,
        });
        break;

      case "user.deleted": {
        const clerkUserId = event.data.id!;
        await ctx.runMutation(internal.users.deleteFromClerk, { clerkUserId });
        break;
      }
      default:
        console.log("Игнорируемое событие веб-хука", event.type);
    }

    return new Response(null, { status: 200 });
  }),
});

async function validateRequest(req: Request): Promise<WebhookEvent | null> {
  const payloadString = await req.text();
  const svixHeaders = {
    "svix-id": req.headers.get("svix-id")!,
    "svix-timestamp": req.headers.get("svix-timestamp")!,
    "svix-signature": req.headers.get("svix-signature")!,
  };
  const wh = new Webhook(process.env.CLERK_WEBHOOK_SECRET!);
  try {
    return wh.verify(payloadString, svixHeaders) as unknown as WebhookEvent;
  } catch (error) {
    console.error("Ошибка при подтверждении события веб-хука", error);
    return null;
  }
}

export default http;
Use of user data
import { v } from "convex/values";
import { mutation } from "./_generated/server";
import { getCurrentUserOrThrow } from "./users";

export const send = mutation({
  args: { body: v.string() },
  handler: async (ctx, args) => {
    const user = await getCurrentUserOrThrow(ctx);
    await ctx.db.insert("messages", { body: args.body, userId: user._id });
  },
});
Retrieving user data
export const list = query({
  args: {},
  handler: async (ctx) => {
    const messages = await ctx.db.query("messages").collect();
    return Promise.all(
      messages.map(async (message) => {
        const user = await ctx.db.get(message.user);
        return {
          author: user?.name ?? "Анонимус",
          ...message,
        };
      }),
    );
  },
});
Waiting for the current user to save
Hook for determining the authentication state of the current user and checking the presence of his data in the database:
// src/useCurrentUser.ts
import { useConvexAuth, useQuery } from "convex/react";
import { api } from "../convex/_generated/api";

export function useCurrentUser() {
  const { isLoading, isAuthenticated } = useConvexAuth();
  const user = useQuery(api.users.current);
  // Комбинируем состояние аутентификации с проверкой наличия пользователя
  return {
    isLoading: isLoading || (isAuthenticated && user === null),
    isAuthenticated: isAuthenticated && user !== null,
  };
}
You can then render the corresponding components:
import { useCurrentUser } from "./useCurrentUser";

export default function App() {
  const { isLoading, isAuthenticated } = useCurrentUser();

  return (
    <main>
      {isLoading ? (
        <>Загрузка...</>
      ) : isAuthenticated ? (
        <Content />
      ) : (
        <LoginPage />
      )}
    </main>
  );
}
This completes the second part of the guide. See you in the next part.
News, product reviews and competitions from the Timeweb.Cloud team - in our Telegram channel ↩

Why This Matters In Practice
Beyond the original publication, Convex Guide. Part 2 matters because teams need reusable decision patterns, not one-off anecdotes. Hello friends! In this series of articles I talk about Convex - a new open and free BaaS (Backend as a Service) solution that looks very pro...
Operational Takeaways
- Separate core principles from context-specific details before implementation.
- Define measurable success criteria before adopting the approach.
- Validate assumptions on a small scope, then scale based on evidence.
Quick Applicability Checklist
- Can this be reproduced with your current team and constraints?
- Do you have observable signals to confirm improvement?
- What trade-off (speed, cost, complexity, risk) are you accepting?


