Building Your Own Island: Creating Minimal Linux for Raspberry Pi
A detailed guide to building a minimal Linux distribution for Raspberry Pi 3 and 4 from scratch, covering cross-compilation, kernel configuration, BusyBox, Device Tree, and UART debugging.

In this article, we'll build a minimal Linux distribution for Raspberry Pi 3 and 4 from scratch — without using Buildroot or Yocto Project. I call it Robinson Linux, because like Robinson Crusoe, we're building everything on our own island with just what we have.
Understanding how to assemble a Linux system from components is invaluable for embedded systems development. Once you understand the principles, you can port the system to virtually any single-board computer.
Features of Building Linux for Embedded Systems
Embedded systems differ fundamentally from desktop PCs. There's no BIOS, no UEFI, no standardized boot process. Each board has its own way of starting up, its own hardware quirks, and its own set of required firmware. This is why you need a Board Support Package (BSP).
Board Support Package (BSP)
A BSP is the collection of platform-specific components necessary for Linux to boot correctly on a particular board. It includes:
- Firmware and bootloaders
- Device tree configurations
- Kernel patches and configurations
- Hardware-specific drivers
Toolchain and Cross-Compilation
Since we're building on an x86 machine for an ARM64 target, we need cross-compilation tools. You must set two environment variables:
ARCH=arm64
CROSS_COMPILE=aarch64-linux-gnu-
These tell the build system which architecture to target and which compiler prefix to use.
Bootloader
The Raspberry Pi has a unique four-stage boot process:
- First stage (BootROM) — hardcoded in the SoC, loads
bootcode.binfrom the SD card's FAT32 partition - Second stage (bootcode.bin) — initializes RAM and loads the GPU firmware
- Third stage (start.elf) — the GPU firmware, which reads
config.txt, loads the device tree and kernel - Fourth stage (kernel) — the Linux kernel takes over
All of this is proprietary firmware that runs on the GPU before the ARM CPU even wakes up.

Device Tree
Unlike PCs with ACPI, embedded systems use Device Tree — a binary file (.dtb) that describes the hardware configuration to the kernel. The kernel reads this file at boot to discover what peripherals are available and how to communicate with them.
An important distinction: upstream kernels use bcm2837-rpi-3-b.dtb while downstream Raspberry Pi kernels use bcm2710-rpi-3-b.dtb. These are located in arch/arm64/boot/dts/broadcom/.
Building Linux
Let's get to the actual build process. We'll compile two kernels — one from upstream (kernel.org) and one from the Raspberry Pi Foundation's downstream fork — to compare their behavior.
Build Environment Setup
We use Docker for a reproducible build environment:
FROM debian:bookworm

RUN apt update && apt install -y --no-install-recommends \
    build-essential crossbuild-essential-arm64 wget xz-utils cpio flex bison bc file tree \
    ncurses-dev libelf-dev libssl-dev git ca-certificates parted kpartx dosfstools e2fsprogs mount \
    && apt clean \
    && rm -rf /var/lib/apt/lists/*

WORKDIR /workspace

CMD ["/bin/bash"]
sudo docker build -t robinson-linux-builder .
sudo docker run -it --rm --privileged -v $(pwd):/workspace robinson-linux-builderOn Windows:
docker run -it --rm --privileged -v %cd%:/workspace robinson-linux-builderUpstream Kernel Compilation
mkdir /build && cd /build
wget https://cdn.kernel.org/pub/linux/kernel/v6.x/linux-6.12.56.tar.xz
tar xvf linux-6.12.56.tar.xz --strip-components=1 -C linux-upstream
We start with tinyconfig — the absolute minimal kernel configuration — and selectively enable only what we need:
cd linux-upstream
make ARCH=arm64 CROSS_COMPILE=aarch64-linux-gnu- tinyconfig && \
./scripts/config \
-e OF_ALL_DTBS \
-e TTY \
-e ARCH_BCM -e ARCH_BCM2835 \
-e SERIAL_OF_PLATFORM -e SERIAL_8250_SHARE_IRQ -e SERIAL_8250 -e SERIAL_8250_EXTENDED \
-e SERIAL_8250_BCM2835AUX -e SERIAL_8250_CONSOLE \
-e DEVTMPFS -e DEVTMPFS_MOUNT -e TMPFS -e PROC_FS -e SYSFS \
-e BINFMT_ELF -e BINFMT_SCRIPT \
-e PRINTK -e PRINTK_TIME \
-e RASPBERRYPI_FIRMWARE \
-e BCM2835_MBOX -e MAILBOX \
-e DMADEVICES -e DMA_CMA -e CMA -e DMA_BCM2835 -e ZONE_DMA -e ZONE_DMA32 \
-e BLOCK -e EXT4_FS \
-e MMC_BLOCK -e MMC -e MMC_SDHCI -e MMC_SDHCI_PLTFM -e MMC_SDHCI_IO_ACCESSORS -e MMC_SDHCI_IPROC -e MMC_SDHCI_OF_ARASAN -e MMC_BCM2835

make ARCH=arm64 CROSS_COMPILE=aarch64-linux-gnu- olddefconfig
make ARCH=arm64 CROSS_COMPILE=aarch64-linux-gnu- -j$(nproc)
Let's break down what these kernel options do:
OF_ALL_DTBS— build all device tree filesTTY— terminal supportARCH_BCM,ARCH_BCM2835— Broadcom SoC support (Raspberry Pi's chip)SERIAL_8250_BCM2835AUX— the mini UART driver for serial consoleDEVTMPFS,PROC_FS,SYSFS— essential virtual filesystemsBINFMT_ELF— ability to execute ELF binariesMMC_*— SD card driversDMA_BCM2835— DMA controller for the Raspberry Pi
Downstream Kernel Compilation
cd /build
git clone --depth=1 -b rpi-6.12.y https://github.com/raspberrypi/linux.git linux-downstream
cd linux-downstream
make ARCH=arm64 CROSS_COMPILE=aarch64-linux-gnu- tinyconfig && \
./scripts/config \
-e OF_ALL_DTBS \
-e TTY \
-e ARCH_BCM -e ARCH_BCM2835 \
-e SERIAL_OF_PLATFORM -e SERIAL_8250_SHARE_IRQ -e SERIAL_8250 -e SERIAL_8250_EXTENDED \
-e SERIAL_8250_BCM2835AUX -e SERIAL_8250_CONSOLE \
-e DEVTMPFS -e DEVTMPFS_MOUNT -e TMPFS -e PROC_FS -e SYSFS \
-e BINFMT_ELF -e BINFMT_SCRIPT \
-e PRINTK -e PRINTK_TIME \
-e RASPBERRYPI_FIRMWARE \
-e BCM2835_MBOX -e MAILBOX \
-e DMADEVICES -e DMA_CMA -e CMA -e DMA_BCM2835 -e ZONE_DMA -e ZONE_DMA32 \
-e BLOCK -e EXT4_FS \
-e MMC_BLOCK -e MMC -e MMC_SDHCI -e MMC_SDHCI_PLTFM -e MMC_SDHCI_IO_ACCESSORS -e MMC_SDHCI_IPROC -e MMC_SDHCI_OF_ARASAN -e MMC_BCM2835

make ARCH=arm64 CROSS_COMPILE=aarch64-linux-gnu- olddefconfig
make ARCH=arm64 CROSS_COMPILE=aarch64-linux-gnu- -j$(nproc)
User Applications: BusyBox
For userspace, we use BusyBox — a single binary that provides hundreds of standard Unix utilities in a tiny package:
cd /build
wget -q https://busybox.net/downloads/busybox-1.37.0.tar.bz2
tar xjf busybox-1.37.0.tar.bz2
cd busybox-1.37.0
make CROSS_COMPILE=aarch64-linux-gnu- defconfig
sed -i 's/^CONFIG_SHA256_HWACCEL=y/# CONFIG_SHA256_HWACCEL is not set/' .config
sed -i 's/^CONFIG_SHA1_HWACCEL=y/# CONFIG_SHA1_HWACCEL is not set/' .config
mkdir -p ../rootfs/{bin,sbin,etc,proc,sys,usr/{bin,sbin},dev,run,tmp,var}
make CROSS_COMPILE=aarch64-linux-gnu- CONFIG_STATIC=y CONFIG_PREFIX=../rootfs -j$(nproc) install
We disable hardware-accelerated SHA because we're cross-compiling and the ARM crypto extensions aren't available on the build host.
The Init Script
The init script is the first program the kernel runs after booting. Ours is minimal:
rm ../rootfs/sbin/init
cat << 'EOF' > ../rootfs/sbin/init
#!/bin/sh
mount -t proc none /proc
mount -t sysfs none /sys
mount -t tmpfs tmpfs /run
mount -t tmpfs tmpfs /tmp
mdev -s
TTY=/dev/$(head -1 /sys/class/tty/console/active)
echo 0 > /proc/sys/kernel/printk
printf "\033c" > $TTY
cat << INNER > $TTY
Welcome to ArtyomSoft Robinson Linux for Raspberry Pi
TTY: $(basename $TTY)
Time: $(date)
Kernel version: $(uname -r)
INNER
exec setsid sh -c "exec sh <'$TTY' >'$TTY' 2>'$TTY'"
EOF
chmod +x ../rootfs/sbin/init
This script mounts essential virtual filesystems, populates /dev using mdev, suppresses kernel messages, clears the screen, displays a welcome banner, and drops into an interactive shell.
SD Card Image Creation
Now we create the disk image with two partitions:
cd /workspace
dd if=/dev/zero of=robinson-linux.img bs=1M count=1024 status=progress
parted robinson-linux.img --script mklabel msdos
parted robinson-linux.img --script mkpart primary fat32 4MiB 200MiB
parted robinson-linux.img --script set 1 boot on
parted robinson-linux.img --script mkpart primary ext4 200MiB 100%
LOOP_DEVICE=$(losetup -f --show robinson-linux.img)
LOOP_NAME="${LOOP_DEVICE##*/}"
kpartx -av $LOOP_DEVICE
BOOT_PARTITION="/dev/mapper/${LOOP_NAME}p1"
ROOT_PARTITION="/dev/mapper/${LOOP_NAME}p2"mkfs.vfat -F 32 $BOOT_PARTITION
mkfs.ext4 -F $ROOT_PARTITIONTMP_MOUNT=$(mktemp -d /tmp/rpi-image-XXXXXX)
TMP_BOOT="$TMP_MOUNT/boot"
TMP_ROOT="$TMP_MOUNT/root"
mkdir -p "$TMP_BOOT" "$TMP_ROOT"
mount "$BOOT_PARTITION" "$TMP_BOOT"
mount "$ROOT_PARTITION" "$TMP_ROOT"Bootloader Configuration
The config.txt file tells the Raspberry Pi firmware how to boot:
kernel=kernel8.img
os_prefix=upstream/
arm_64bit=1
enable_uart=1

[pi3]
cmdline=cmdline_rpi3.txt
core_freq=250

[pi4]
cmdline=cmdline_rpi4.txt
The cmdline.txt files differ between Pi 3 and Pi 4, and between upstream and downstream kernels, because the serial port names differ:
mkdir -p $TMP_BOOT/upstream
cat > "$TMP_BOOT/upstream/cmdline_rpi4.txt" < "$TMP_BOOT/upstream/cmdline_rpi3.txt" < "$TMP_BOOT/cmdline_rpi4.txt" < "$TMP_BOOT/cmdline_rpi3.txt" <
Note the differences: upstream uses ttyS1 while downstream uses serial0. Also, the Pi 4 with upstream kernel uses mmcblk1p2 while others use mmcblk0p2.
Installing Firmware and Kernels
wget -O firmware.tar.xz https://github.com/raspberrypi/firmware/releases/download/1.20250915/raspi-firmware_1.20250915.orig.tar.xz
tar -xf firmware.tar.xz --strip-components=2 -C $TMP_BOOT
rm firmware.tar.xz
cp /build/linux-upstream/arch/arm64/boot/Image $TMP_BOOT/upstream/kernel8.img
cp /build/linux-downstream/arch/arm64/boot/Image $TMP_BOOT/kernel8.img
Installing Device Trees
cp /build/linux-upstream/arch/arm64/boot/dts/broadcom/bcm2837-rpi-3-b.dtb $TMP_BOOT/upstream/
cp /build/linux-upstream/arch/arm64/boot/dts/broadcom/bcm2711-rpi-4-b.dtb $TMP_BOOT/upstream/
cp /build/linux-downstream/arch/arm64/boot/dts/broadcom/bcm2710-rpi-3-b.dtb $TMP_BOOT/
cp /build/linux-downstream/arch/arm64/boot/dts/broadcom/bcm2711-rpi-4-b.dtb $TMP_BOOT/
Populating the Root Filesystem
cp -ra /build/rootfs/. $TMP_ROOTCleanup and Unmounting
umount $TMP_ROOT
umount $TMP_BOOT
kpartx -dv $LOOP_DEVICE
losetup -d $LOOP_DEVICE
Writing to SD Card
dd if=robinson-linux.img of=/dev/mmcblk0 bs=10M status=progress
sync
UART Usage
UART (Universal Asynchronous Receiver-Transmitter) is essential for embedded development. It's your window into the system when there's no display, no network, and no SSH. Connect a USB-to-UART adapter to the Raspberry Pi's GPIO pins and use a terminal emulator:
sudo picocom -b 115200 /dev/ttyUSB0
Kernel Debugging via UART
The earlycon parameter in the kernel command line enables early console output — messages appear even before the kernel's normal console driver is initialized. This is critical for debugging boot failures.
Bootloader Debug Information
You can enable UART output from the bootloader itself by modifying bootcode.bin:
sed -i -e "s/BOOT_UART=0/BOOT_UART=1/" bootcode.binThis lets you see what the bootloader is doing before the kernel even starts.

Running Robinson Linux on Raspberry Pi
After writing the image to an SD card and connecting UART, you should see the welcome message:
Welcome to ArtyomSoft Robinson Linux for Raspberry Pi
TTY: ttyS1
Time: Thu Jan  1 00:00:05 UTC 1970
Kernel version: 6.12.56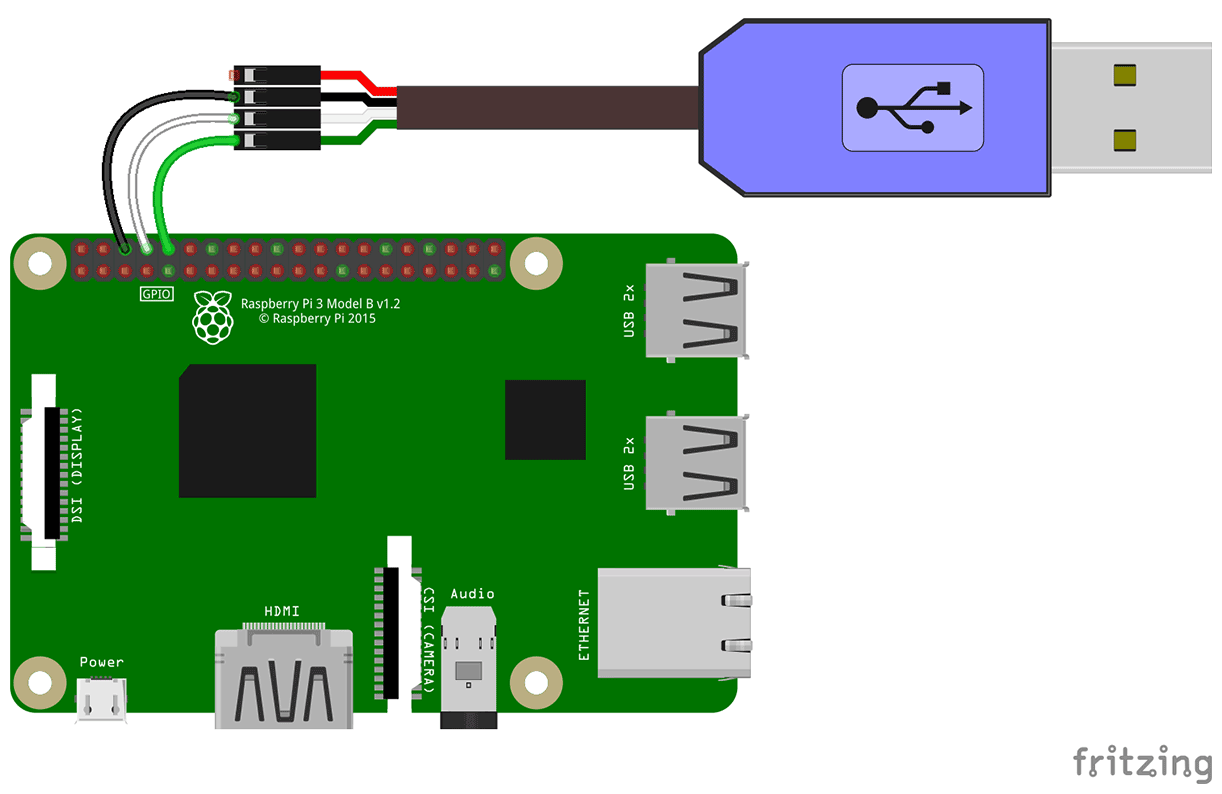
Conclusions
We've built a complete, minimal Linux system from scratch for the Raspberry Pi. The key takeaways are:
- Understanding BSP components is essential for embedded Linux development
- The
tinyconfigapproach lets you build the smallest possible kernel and add only what you need - Cross-compilation requires proper toolchain setup but follows predictable patterns
- Device trees replace ACPI/BIOS on embedded platforms
- UART is your best friend when bringing up a new embedded system
Once you understand these principles, porting Linux to any single-board computer follows the same general pattern: find or create the BSP, configure the kernel for the target hardware, build a minimal root filesystem, and debug via UART.
The complete build automation scripts are available on GitHub at robinson-linux.


